Configure Azure Graph API for Chime V5
First Steps Setting Up SharePoint Import Integration
This article is intended to assist with the setup of Azure Graph API for Chime v5 SharePoint Importer feature.
As part of this setup, we will need to do the following steps to have this feature fully configured:
Add the SharePoint (Site) Application Permission onto your Chime App Registration and have it approved by an Azure Admin.
Setup the SharePoint Importer Setting in Chime Admin area.
Have an Azure Admin consent to the application changes that were made.
Important Roles
As part of this setup and configuration process, a tenant administrator for the Microsoft Office 365 tenant will need to perform several actions in order to provide the necessary authorization for the SharePoint connector.
Azure Admin with permissions to grant consent on App Registration Permission updates
Chime Admin
App Registration
From the app registration, save the following values:
The application ID (referred to as Object ID on the Microsoft Entra admin center) assigned by the app registration portal
A client secret (application password)
Azure Graph API SharePoint (Site) Permission
Steps for Azure Admin for setting up permissions:
- Navigate to https://portal.azure.com/ and then Microsoft Entra ID (previously Azure Active Directory)
- Click on the App Registrations option on the left-side menu.
- Select the application that is used for your Chime deployment.
- In this new view, click the API Permissions button.

In Azure look the API permissions area
In the Azure portal, look at the app registration and API permissions
Add permission to help configure the graph API
In the Azure portal adjust the graph api permissions
- Select Microsoft Graph from the list of Microsoft API’s listed.
Common Microsoft APIs
- Select Application permissions.
- Use the search bar to find and add the following required permissions:
- Sites.Read.All
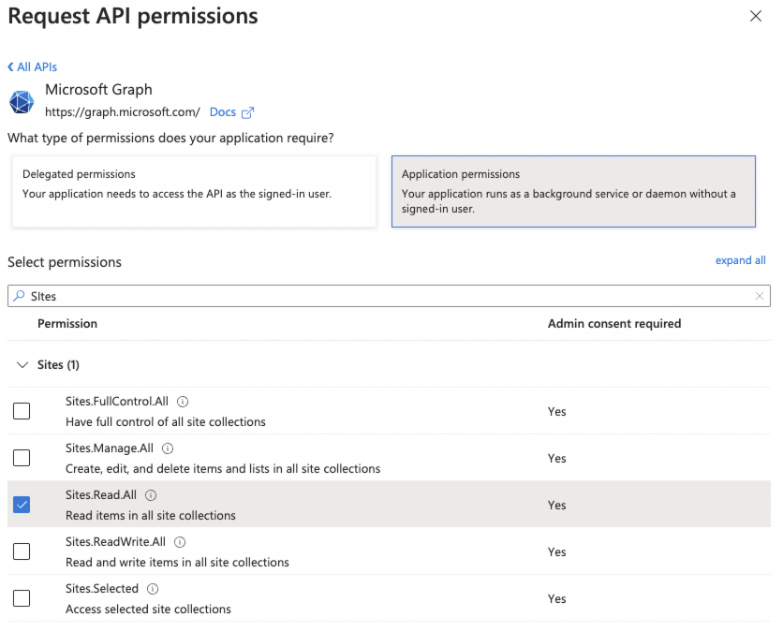
Enable Sites.Read.All to provide graph API permission so that our application can import SharePoint content for chat FAQs
All graph sites.read.all to enable our FAQs to import content
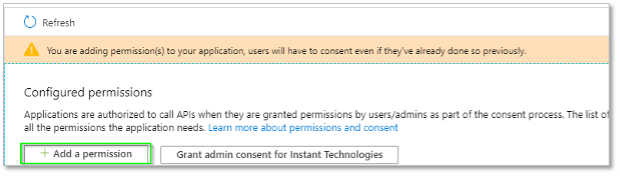
Click the Add Permissions button.
It is necessary to grant administrator consent for this permission. Click the Grant admin consent button.

Grant admin consent will also be necessary
The Sites.Read.All will be allowed using grant admin consent
- For creating Client Secret click the Certificates & secrets button.
Create a client secret using the certificates and secrets
- Click the New client secret button.
- Enter a description for your client secret.
- Click **Add **to create a new API key.
- Copy the newly created API secret key somewhere you can retrieve it. You will need this API secret key when configuring the SharePoint Importer feature.

Using SharePoint content as part of ChatBot or Chat FAQ system requires some graph API permissions
This new API secret will allow our platform to access the SharePoint content to import FAQs
Additional Resources
February 2024 Updates
I’d like to share a few updates from our team as well as some of the news that we are following from Microsoft.
First, we have continued to update Chime V4 and we have recently made some improvements to the way that the application tracks the agent’s presence. We are now using some recently released updates to the Microsoft Teams presence API and this may only be important if you sometimes encounter sporadic presence changes across your list of agents in Chime.
Here is the Chime V4 landing page with release notes: https://www.addchime.com/teams-release-notes.html
With Chime V5, we are continuing to add additional features around our chat pipelines, the FAQ area, AI features, and agent tools.
With our chat pipelines, we have created a modular (Orchard) approach to the pipeline service. This allows us to easily add additional pipeline actions (such as ChatPGT) and add support for additional ticketing providers (we currently support SolarWinds, ServiceNow, Cherwell, and Invgate). Our ticketing integration is designed to help deflect inbound chats by displaying active tickets, provide the agent with a list of the tickets when the agent accepts the chat, or create a ticket after the chat is completed.
Fikri provides a nice demo of some of this integration – as well as some integration with ChatGPT.
https://www.youtube.com/watch?v=wmDWstfAmsU
As some background, Chime V5 is built ‘on top of’ an enterprise CMS (Orchard) platform. We built on a CMS in order to create and manage content (FAQs, KB articles, Reports) that would be helpful as part of employee self-service. Currently, these FAQs can be used during inbound chat sessions, as well as to help create a searchable index that could be integrated with AI based services (models). The opportunity here is that a custom conversational experience can be ‘seeded’ with FAQs and the conversational experience can be improved by creating, or updating, FAQs and other content. These FAQs and KB articles can also help agents resolve questions.
Our FAQs now include the following features that we know will be beneficial:
1 FAQs can be created and stored at part of a department (your tenant). These FAQs can be searched as part of an inbound chat session and provided to agents.
2 We have created a new synchronization service to automatically index Chime based FAQs against an AI Cognitive Service. Once indexed, the content from these FAQs can be combined with a ChatGPT base model to create an excellent custom conversational chat experience. We’ve also created a ChatGPT pipeline service to integrate this functionality into chat.
3 We are also developing a SharePoint integration layer to import content from a SharePoint library into our FAQ system. Once imported, this content can also be indexed and used as part of a conversational chat experience.
Please contact us if you’d like to provide feedback, or test, this SharePoint integration feature.
Here is some information on our FAQ system: https://www.chimev5.com/ai-help-desk-faq-articles
Here is a link to our Chime V5 release notes: https://www.chimev5.com/teams-integrated-azure-ai-powered-help-desk-release-notes
Today, Microsoft announced the general available of ‘On Your Data’ which is now available in the Azure Open AI Service: https://techcommunity.microsoft.com/t5/ai-azure-ai-services-blog/on-your-data-is-now-generally-available-in-azure-openai-service/ba-p/4059514
We are using these same techniques, as well as the Azure AI service to index and overlay Chime content against common models GPT 35 and GPT-4. With Chime, we also add routing to agents, live dashboards, reporting on every chat session and interaction, and configurable chat routing. Service desk agents will also have access to these tools after they accept a chat conversation – in addition to real time language translation.
Chime V5 is available from the Microsoft Teams Store: https://appsource.microsoft.com/en-us/product/office/WA200005569
As well as the Microsoft AppSource: https://appsource.microsoft.com/en-us/product/web-apps/invitrixllcdbainstanttechnologies1588961047387.instant_chime_v5_july_2023
Please reach out with any questions or contact me with questions or feedback.
We are very interested in learning about your ideas (and strategies) around employee self-service and leveraging chat, AI, and content to help employees quickly resolve issues.
Peyton
Integrating Microsoft Teams Chat into Your Webpage
Add Customizable Web & Teams Client To Your Site
Are you looking to enhance your help desk landing page or support webpage by integrating your Microsoft Teams Bot Framework application? Look no further – this guide will walk you through the process of creating an HTML button that opens your Teams bot, allowing your end users to access it without leaving your webpage.
Step 1: Get your Chime Dispatcher Bot ID (Bot Framework ID)
- Navigate to Chime > Admin > Dispatcher.
- Locate the queue dispatcher that you want to expose to your webpage.
- Copy the Bot ID associated with the chosen dispatcher.
Step 2: Create the Button HTML Element
Replace the BOT_ID string in the template below with the Bot ID obtained in Step 1.
<button onclick="window.open('msteams:/l/chat/0/0?users=28:'+'BOT_ID', '_parent')">IT Service Desk</button>
Step 3: Add the HTML Button to Your Webpage and Test
- After updating the HTML button template, copy and paste the button element into your webpage.
- Click on the button.
Chat FAQ chatbot to your web page
Launch a MS Teams link from your web page or start a chat using the web client - using Azure Bot Framework
- If you are using Chrome, click on Open Microsoft Teams.
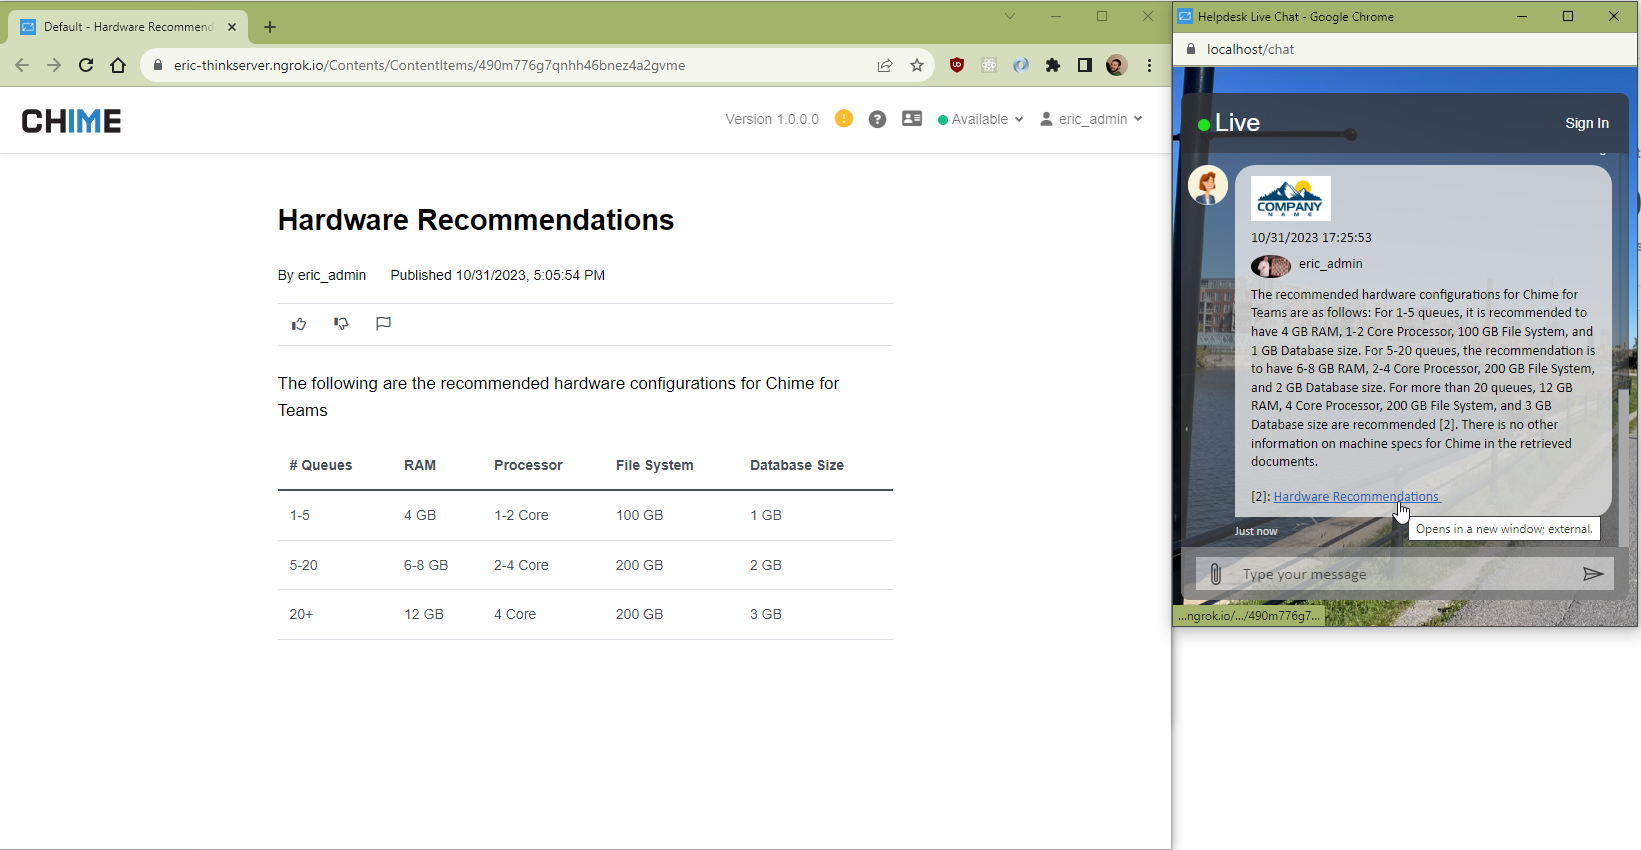
- The Microsoft Teams desktop client should now direct you to your bot conversation.
Use Microsoft Teams for a FAQ chatbot or to connect chats with service desk agents
Quickly solve employee problems by displaying chat FAQS or routing requests to service desk agents - all with FAQs, AI, and no programming
Now, your users can access your Microsoft Teams Bot Framework application through your webpage, enhancing the overall user experience.
AI Agent Translation: Bridging Communication Across Languages
Enable AI Translation For Real-Time Translation For Guests & Agents
Overview
In the ever-evolving landscape of communication tools, ChimeV5.AI takes a leap forward with its latest update. This update introduces a groundbreaking feature – ChimeV5.AI.AgentTranslation, designed to facilitate seamless communication between agents and guests, breaking down language barriers in real-time.
Feature: ChimeV5.AI.AgentTranslation
This new feature is a game-changer for Premium and Enterprise tier Chime tenants, offering translation services when agents and guests are connected. However, please note that this feature is not available for Standard tier tenants. To utilize ChimeV5.AI.AgentTranslation, the ChimeV5.AI.Translation feature must be enabled and configured.
Agent Translation Feature in Admin Dashboard
Enable Agent Translation from the Admin Dashboard
Changes to Azure Translation Service Settings
The ChimeV5.AI.Translation feature has undergone a refinement to enhance user experience. The "Test Connection" button now seamlessly tests Azure service settings without reloading the entire settings page. This improvement prevents the loss of recently tested values and resolves issues with the Azure SignalR service.
Azure Translation Admin Settings
Agent Translation uses the Azure Translation service, and this is where you can add those settings
New Features for ChimeV5.AI.AgentTranslation
Tenant-level Language Selection
ChimeV5.AI.AgentTranslation introduces tenant-level language selection, allowing administrators to control language options available to agents. The toggle for "Select Available Languages" empowers administrators to either permit agents to choose from all Azure Translation-supported languages or restrict them to a predefined list.

Agent Translation Configuration
Select the language you want to translate to from the Translation Configuration UI
Agent Language Selection
Agents now have a "Translation Settings" tab in their user profile, enabling them to set their preferred language. Administrators can also manage this preference from the Manager Dashboard or the Agent Dashboard.

Agent Settings
Select preferred language from the Agent Settings UI
Guest Webclient Changes
The guest's preferred language is automatically detected based on their browser language settings shown in Guest.Locale metadata. For testing purposes, this can be overridden through Chrome Dev Tools.
Agent Web Client Translation Metadata
See the Guest’s translation language code from the session details metadata
Agent Web Client Changes
Translation Tab
The agent web client now boasts a "Translation" tab when connected to a guest. Agents can set their preferred language, and this locale is tagged to their connection for the duration of the chat session.
Agent Web Client - Translation Tab
Access the Agent Translation Settings from the agent web client
Real-time Translation
Messages between the guest and the agent are translated in real-time. Whether the language is the same or different, ChimeV5.AI.AgentTranslation ensures clear communication.
Guest Web Client with Translated Message
See how the guest user experience look like when receiving a translated message from the agent translation
Chat Transcript
The chat transcript provides a comprehensive record, showcasing the guest's experience with translated messages received and the original text sent by agents.
Chat Transcript - Translated Messages
See translated chat logs or chat transcript between agent and employees
Architectural Details
ChimeV5.AI.AgentTranslation takes a server-side approach for translation, enhancing simplicity and security. By handling translations on the server engine side, the system avoids exposing API keys to the client, ensuring a more secure environment.
The decision to implement server-side translation simplifies the process of translating plain-text messages exchanged between agents and guests. This approach also maintains a secure environment for API keys, eliminating potential risks associated with client-side exposure.
All Metadata Values Available in Chime
View The Latest Set Of Metadata Variables
This will cover all available metadata variables that are usable for reporting, adaptive cards, standard replies, and outages.
Guest Variables
| Variable Name | Description | Example Values |
|---|---|---|
| Guest.AadObjectId | Guest user's Active Directory/Entra User Object ID | e6a2b68c-2cdf-4b83-abea-f29f710aea0c |
| Guest.ChannelId | Channel Guest is coming in on (directline or msteams) | msteams |
| Guest.Email | Email of the Guest | bsmith@example.com |
| Guest.GivenName | First/Given name of the Guest | Bob |
| Guest.Id | Chime ID of the Guest | dl_bsmith@00000000-0000-0000-0000-000000000000 |
| Guest.IsNew | True or False for if this is the first time the Guest is using Chime | true |
| Guest.Locale | Location and Language settings of the Guest | en-US |
| Guest.Name | Full name of the Guest | Bob Smith |
| Guest.Question | Question of the Guest | Hi I need to reset my email password |
| Guest.Surname | Last/Surname of the Guest | Smith |
| Guest.TenantId | Tenant ID for the organization of the Guest | |
| Guest.TenantName | Tenant name that the Guest is coming into | Example Inc |
| Guest.UserPrincipleName | Active Directory/Entra UPN of the Guest (username and domain in an email address format) | bsmith@example.com |
| Guest.Country | Country of the Guest | US |
| Guest.Timezone | Timezone of the Guest | America/New_York |
| Guest.Platform | Operating system/platform the Guest is using | Windows |
Session Variables
| Variable Name | Description | Example Values |
|---|---|---|
| Session.EndedUtc | Date and time that the chat session ended in UTC timezone | 01/04/2024 17:42:47 |
| Session.ChatID | Directline Chat ID for the current session | 8bVNRWxnMRvFBiUj7VhFAB-us |
| Session.State | State name that the chat session is in | Completed |
| Session.Status.IsResolved | Boolean for if the chat session was resolved or not | True |
| Session.Status.ResolutionNotes | Can be used to provide notes about the chat resolution by the pipeline or by Agents after the chat ended | Guest was able to use ChatGPT assist to answer their questions and resolve this chat |
| Session.Status.ResolvedByAgentId | Agent Id for agent that resolved the chat session | 47ab169g1vp5hzm09914stk55g |
| Session.Status.ResolvedByAgentName | Lists out the name/names of Agents that were in the chat when it was resolved | John Doe, Jane Doe |
| Session.Status.ResolvedByType | Describes which Pipeline Item the chat was at when it was resolved | Agent, ChatGPT, AI Assist |
| Session.WasConnectedWithAgent | Boolean for if the Guest was connected to an Agent in the chat session | true |
| Session.deflected | Boolean for if the chat session was deflected | True |
| Session.deflectedBy | Describes which Pipeline Item the chat was at when it deflected | FAQ Lookup |
| Session.SessionId | Chime's internal Session ID for the chat session | 3b810491-a2d3-4a2a-95e9-fc75e7107819 |
| Session.StartedUtc | Date and time that the chat session started in UTC timezone | 05/27/2022 133429 |
| Session.ReferrerUrl | If the chat was started from webclient, this is the URL of the page it came from | https://example.com/ |
| Session.EntryPoint | Method the Guest used to start the chat session, Teams or Webclient | Webclient |
| Session.CurrentPipelineStage.Name | Name of the Pipeline Item that the chat session is on currently | connectToAgent |
| Session.CurrentPipelineStage.Type | Type of Pipeline Item that the chat session is on | ConnectedToAgentState |
| Session.PipelinePath | List of JSON objects that cover each Pipeline Item the chat has routed through | [ { "ToState": "welcomeMessage", "ToStateType": "SendCardState", "FromState": "StartChat", "Timestamp": "2024-01-04T18:18:11.3745466+00:00" }, { "ToState": "connectToAgent", "ToStateType": "ConnectedToAgentState", "FromState": "welcomeMessage", "FromStateType": "SendCardState", "Timestamp": "2024-01-04T18:19:11.3745508+00:00" }] |
| Session.SkillTags | Comma seperated list of any Skill Tags that are linked to the chat session | Office365, Email |
| Session.SkillTagList | List format of any Skill Tags that are linked to the chat session | [ "Office365", "Email" ] |
| Session.PickChatUrl | URL the Agent can use to pick/accept the chat session | https://app.imchime.com/Example/Session/00000000-0000-0000-0000-000000000000?connectToSession=true |
| Session.IsConnectedToAgent | Dynamic boolean for if the Guest is connected with one or more Agents | true |
| Session.IsWaiting | Dynamic boolean for if the Guest is currently in the "Conect to Agent" Pipeline Item and waiting for an Agent to accept their chat session | false |
| Session.StartedWaitingAt | Date and time the chat session went into the Waiting state (Guest is routing to an Agent) | 2024-01-04T18:20:05.1769764+0000 |
| Session.ConnectedToAgentAt | Date and time the chat session went into the Connected state (Agent picked up Guest's chat) | 2024-01-04T18:20:11.3769773+0000 |
| Session.WaitTime | The current ammount of time the chat session has been in the Waiting state (JSON object) | { "String": "0:00:06.2", "Seconds": 6, "Minutes": 0, "TotalSeconds": 6.2, "TotalMinutes": 0.10333333333333333 } |
| Session.WaitTime.String | Wait time as a string | 0:00:06.2 |
| Session.WaitTime.Seconds | Number of seconds the chat has been waiting (not total seconds) | 6 |
| Session.WaitTime.Minutes | Number of minutes the chat has been waiting | 0 |
| Session.WaitTime.TotalSeconds | Total number(decimal) of seconds the chat session has been waiting | 6.2 |
| Session.WaitTime.TotalMinutes | Total number(decimal) of minutes the chat session has been waiting | 0.10333333333333333 |
| Session.ConnectedTime | The current ammount of time the chat session has been connected to an Agent (JSON object) | { "String": "0:03:42", "Seconds": 42, "Minutes": 3, "TotalSeconds": 222, "TotalMinutes": 3.7 } |
| Session.ConnectedTime.String | Connected time as a string | 0:03:42 |
| Session.ConnectedTime.Seconds | Number of seconds the chat has been connected (not total seconds) | 42 |
| Session.ConnectedTime.Minutes | Number of minuntes the chat has been connected | 3 |
| Session.ConnectedTime.TotalSeconds | Total number(decimal) of seconds the chat session has been connected | 222 |
| Session.ConnectedTime.TotalMinutes | Total number(decimal) of minutes the chat session has been connected | 3.7 |
| Session.AverageWaitTime | The average wait time of all sessions over the last 24 hours [Total wait time / number of sessions] (JSON object) | { "String": "0:01:11", "Seconds": 11, "Minutes": 1, "TotalSeconds": 71, "TotalMinutes": 1.1833333333333333 } |
| Session.AverageWaitTime.String | Average wait time as a string | 0:01:11 |
| Session.AverageWaitTime.Seconds | Number of seconds for the chats average wait time (not total seconds) | 11 |
| Session.AverageWaitTime.Minutes | Number of minutes for the chats average wait time | 1 |
| Session.AverageWaitTime.TotalSeconds | Total number(decimal) of seconds for the chats average wait time | 71 |
| Session.AverageWaitTime.TotalMinutes | Total number(decimal) of minutes for the chats average wait time | 1.1833333333333333 |
| Session.AverageWaitTimeLastHour | The average wait time of all sessions over the last hour [Total wait time / number of sessions] (JSON object) | { "String": "0:01:14", "Seconds": 14, "Minutes": 1, "TotalSeconds": 74, "TotalMinutes": 1.2333333333333334 } |
| Session.AverageWaitTimeLastHour.String | Average wait time from the last hour as a string | 0:01:14 |
| Session.AverageWaitTimeLastHour.Seconds | Number of seconds for the chats average wait time from the last hour (not total seconds) | 14 |
| Session.AverageWaitTimeLastHour.Minutes | Number of minutes for the chats average wait time from the last hour | 1 |
| Session.AverageWaitTimeLastHour.TotalSeconds | Total number(decimal) of seconds for the chats average wait time from the last hour | 74 |
| Session.AverageWaitTimeLastHour.TotalMinutes | Total number(decimal) of minutes for the chats average wait time from the last hour | 1.2333333333333334 |
| Session.ExpectedWaitTime | How much longer the Guest is expected to wait [AverageWaitTime - WaitTime] (JSON object) | { "String": "0:01:04.8", "Seconds": 4, "Minutes": 1, "TotalSeconds": 64.8, "TotalMinutes": 1.08 } |
| Session.ExpectedWaitTime.String | Expected wait time as a string | 0:01:04.8 |
| Session.ExpectedWaitTime.Seconds | Number of seconds the chat is expected to wait (not total seconds) | 4 |
| Session.ExpectedWaitTime.Minutes | Number of minutes the chat is expected to wait | 1 |
| Session.ExpectedWaitTime.TotalSeconds | Total number(decimal) of seconds the chat is expected to wait | 64.8 |
| Session.ExpectedWaitTime.TotalMinutes | Total number(decimal) of minuntes the chat is expected to wait | 1.08 |
| Session.ExpectedWaitTimeLastHour | How much longer the Guest is expected to wait [AverageWaitTimeLastHour - WaitTime] (JSON object) | { "String": "0:01:07.8", "Seconds": 7, "Minutes": 1, "TotalSeconds": 67.8, "TotalMinutes": 1.13 } |
| Session.ExpectedWaitTimeLastHour.String | Expected wait time from the last hour as a string | 0:01:07.8 |
| Session.ExpectedWaitTimeLastHour.Seconds | Number of seconds the chat is expected to wait from the last hour (not total seconds) | 7 |
| Session.ExpectedWaitTimeLastHour.Minutes | Number of minutes the chat is expected to wait from the last hour | 1 |
| Session.ExpectedWaitTimeLastHour.TotalSeconds | Total number(decimal) of seconds the chat is expected to wait from the last hour | 67.8 |
| Session.ExpectedWaitTimeLastHour.TotalMinutes | Total number(decimal) of minuntes the chat is expected to wait from the last hour | 1.13 |
| Session.WaitMessageCount | Number of wait messages that have been sent to the Guest while looking for an Agent | 2 |
| Session.ConnectedAgents | List of JSON objects for the Agents that connected to the chat session | [ { "Name": "Jim Jones", "FirstName": "Jim", "LastName": "Jones", "Email": "jjones@example.com", "Connected": "05/27/2022 13:34:56", "ID": "47ab169g1vp5hzm09914stk55g", "ProfileImageUrl": "https://app.imchime.com/Example/media/media/_branding/default_profile.jpg"},{ "Name": "Carol Johnson", "FirstName": "Carol", "LastName": "Johnson", "Email": "cjohnson@example.com", "Connected": "05/27/2022 13:37:56", "ID": "47ab169g1vp5hzm09914stk44g", "ProfileImageUrl": "https://app.imchime.com/Example/media/media/_branding/default_profile.jpg"} ] |
| Session.NumberOfConnectedAgents | The number of Agents currently connected to the chat session | 2 |
| Session.AvailableAgentCount | The number of Agents who are currently online and able to accept the chat session | 3 |
| Session.WaitingGuestCount | The number of Guests who are currently waiting for an Agent to accept their chat session | 4 |
| Session.PositionInQueue | The position in queue that the current chat session is in (how many Guests will get connected to an Agent before this Guests chat session) | 1 |
Agent Variables
| Variable Name | Description | Example Values |
|---|---|---|
| Agent.Name | Full name of the current Agent | Jim Jones |
| Agent.FirstName | First name/Given name of the current Agent | Jim |
| Agent.LastName | Last name/Surname of the current Agent | Jones |
| Agent.Email | Email of the current Agent | jjones@example.com |
| Agent.ProfileImageUrl | Media library URL location of the Agent's profile image | /media/_branding/default_profile.jpg |
| Agent.Connected | Date and time that the Agent connected to the Guest's chat session | 05/27/2022 13:34:56 |
| Agent.ID | Agent ID for the current Agent | 47ab169g1vp5hzm09914stk55g |
Sender Variables
| Variable Name | Description | Example Values |
|---|---|---|
| Sender.Name | Full name of the current Agent | Jim Jones |
| Sender.FirstName | First name/Given name of the current message sender | Jim |
| Sender.LastName | Last name/Surname of the current message sender | Jones |
| Sender.Email | email of the current message sender | jjones@example.com |
| Sender.ProfileImageUrl | Media library URL location of the message sender's profile image | /media/_branding/default_profile.jpg |
| Sender.Locale | Locale of the current message sender | en-US |
Routing Variables
| Variable Name | Description | Example Values |
|---|---|---|
| Routing.AgentList.Name | Name of the agent list | Service Desk |
| Routing.AgentList.Id | ContentItemId of the agent list | 4m49qcqycbygv3m88g80r7aw51 |
| Routing.AgentList.Type | Type of the agent list => [All, Tagged, Selected] | Selected |
| Routing.Mode | Which routing mode is configured for the agent list | RoundRobin |
Chatbot Variables
| Variable Name | Description | Example Values |
|---|---|---|
| Chatbot.ConnectedAt | Date and time when the AI chatbot connected with the guest | 2024-01-17T09:37:11.3745267Z |
| Chatbot.DisconnectedAt | Date and time when the AI chatbot disconnected from the guest | 2024-01-17T16:41:53.3578965Z |
| Chatbot.Escalated | True or false if the chat was escalated to a live agent | false |
| Chatbot.Deflected | True of false if the chat was deflected by the chatbot | true |
AI Summary Metrics
| Variable Name | Description | Example Values |
|---|---|---|
| AI.Summary.Title | AI generated title summarizing the chat session | Installation and configuration of AI-Enabled Help Desk Instant Chiume V5 |
| AI.Summary.Issue | AI generated summary of the initial issue the guest comes in with | The customer wants to know how to install the AI-enabled help desk, Chime V5. |
| AI.Summary.Resolution | AI generated summary of how the chat was resolved between the Agent and Guest | The agent informed the customer that they can install the application from the Microsoft Teams App Store and configure the tenant. No custom Azure resources are required as all necessary resources are included in the deployment. The customer successfully installed the application. |
| AI.Summary.Narrative | AI generated summary of the main important points covered in the chat session | The transcript is about how to install the AI-enabled help desk, Chime V5, from the Microsoft Teams App Store. It explains that the tenant can be configured with a unique database instance, tenant URL, and tenant administrator, and that no custom Azure resources are required. The Web Visitor successfully installed the software. |
Outages
| Variable Name | Description | Example Values |
|---|---|---|
| Session.OutageId | Content ID of the Outage the guest selected | 43mbkc86gc1vjtvt6427cd0jw9 |
| Session.OutageTitle | Title of the Outage the guest selected | Email services down from 5:30 to 7:15 for maintenance |
| Session.SubscribeToOutage | Did the guest subscribe to receive update notifications about the outage? | true |
Ticketing
| Variable Name | Description | Example Values |
|---|---|---|
| Ticket.Id (GUID) | ID of the ticket created | efed3b82-6d83-46fd-b80e-1da34d9a90ff |
| Ticket.Number | Ticket number created in the ticketing system | 0938479538 |
| Ticket.CreatedByChime | Was the ticket created by Chime? (true or false) | true |
| Ticket.URL | URL of the ticket | https://ticketingsystem.com/tickets/0938479538 |
| Ticket.ITSM | Name of the ticketing platform the ticket is on | (JIRA, SERVICE-NOW, SOLARWINDS, JIRA or CHERWELL) |
System Variables
| Variable Name | Description | Example Values |
|---|---|---|
| System.CurrentTimeUTC | Current date and time in UTC time zone | 2024-01-04T18:20:11.3745267Z |
| System.CurrentTime | Current time in local time zone | 14:20:11+0000 |
| System.CurrentDate | Current date in your local time zone | 2024-01-04 |
| System.CurrentDateTime | Current date and time in your local time zone | DATE(2024-01-04) TIME(14:20:11+0000) |
| System.BaseUrl | Base URl of your Chime V5 tenant | https://app.imchime.com/Example |
| System.Tenant | Name of your Chime V5 tenant | Example |
| System.PipelineName | Name of the Pipeline you are routing in | Self Service Pipeline |
| System.MediaUrl | URL of your tenant's Media Library | https://app.imchime.com/Example/media/ |
Maximize InvGate Ticketing Integration To Solve Employee Problems
Add Ticketing Integration To Service Desk Chat
Add a SaaS chat channel to help solve employee problems. Enable employees to search FAQs, solve common problems, route to agents, and integrate with InvGate as the primary ticketing system. Quickly solve employee problems using chat - and maximize your existing investment in InvGate.
The Invgate Ticket Listing Pipeline Action is a powerful feature designed to fetch open incidents for a seeker and associate them with ongoing chat sessions. This integration enhances collaboration and simplifies issue tracking for support teams.
Configuration
To get started, your tenant admin needs to specify the Invgate instance URL and login credentials under Chime Configuration -> Invgate.

Configure Invgate ticketing Instance URL and credentials for your service desk
Apply your credentials on a tenant level to enable the Invgate features
Invgate Ticketing Features
To leverage the Invgate ticketing integration, ensure the following features are enabled:
Invgate.Ticketing
Invgate.Pipeline.TicketListing
Pipeline Configuration

View the different enterprise service desk actions for Invgate ticketing
Integrate Invgate into your service desk to simplify and improve ticket management
Prompt: Define the title that appears on the ticket listing card.
Button Associated With Card: Specify what is written on the button to display on card.
No Result State: Specify the pipeline key for seekers if no incidents are found.
Lookup tickets using Session Meta Data Field: Configure the field for searching incidents, commonly the seeker's email address.
Next Stage: Set the pipeline key for seekers after associating an incident with the session.
Options: Customize additional pipeline navigation options as needed.
Seeker Experience
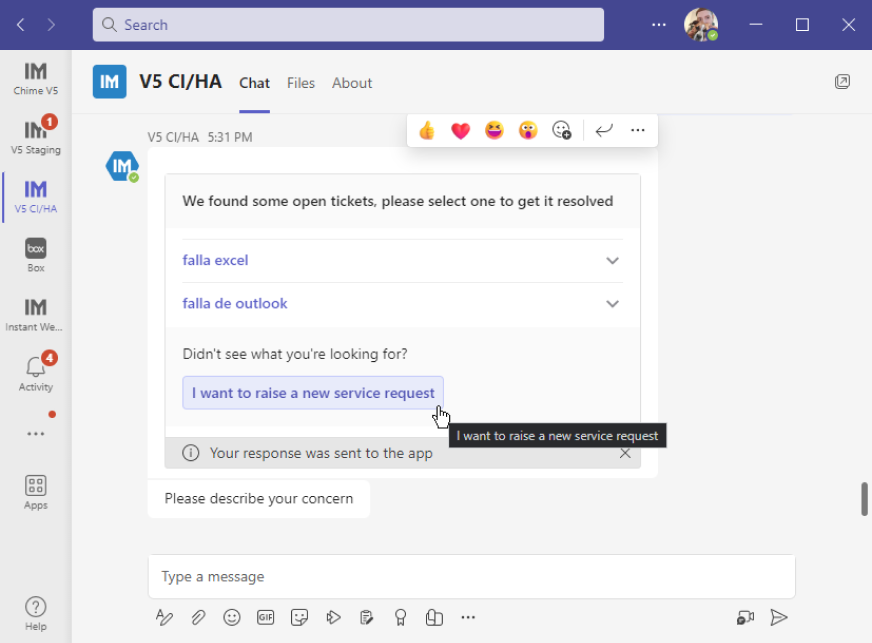
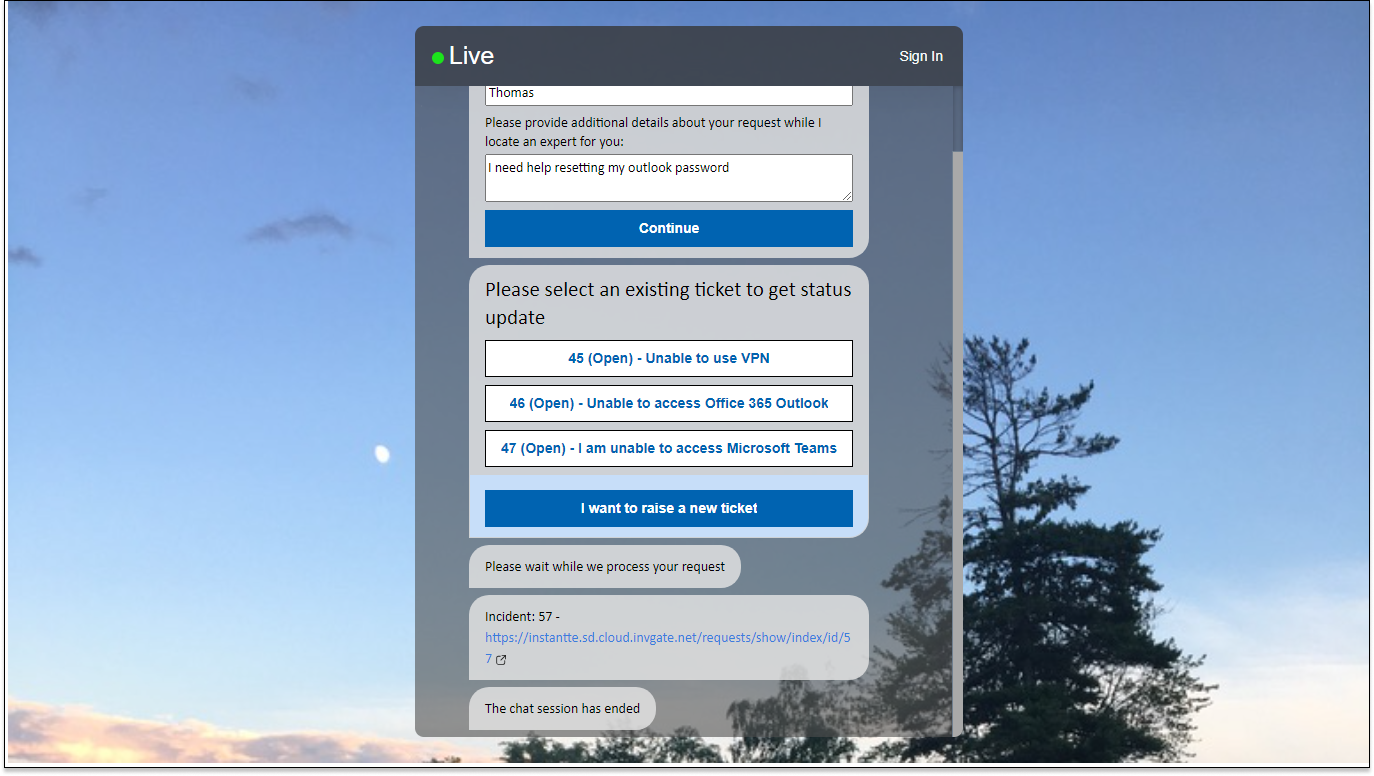
The pipeline displays open incidents, allowing seekers to click on an option to reveal essential details such as links, descriptions, and last updated timestamps.
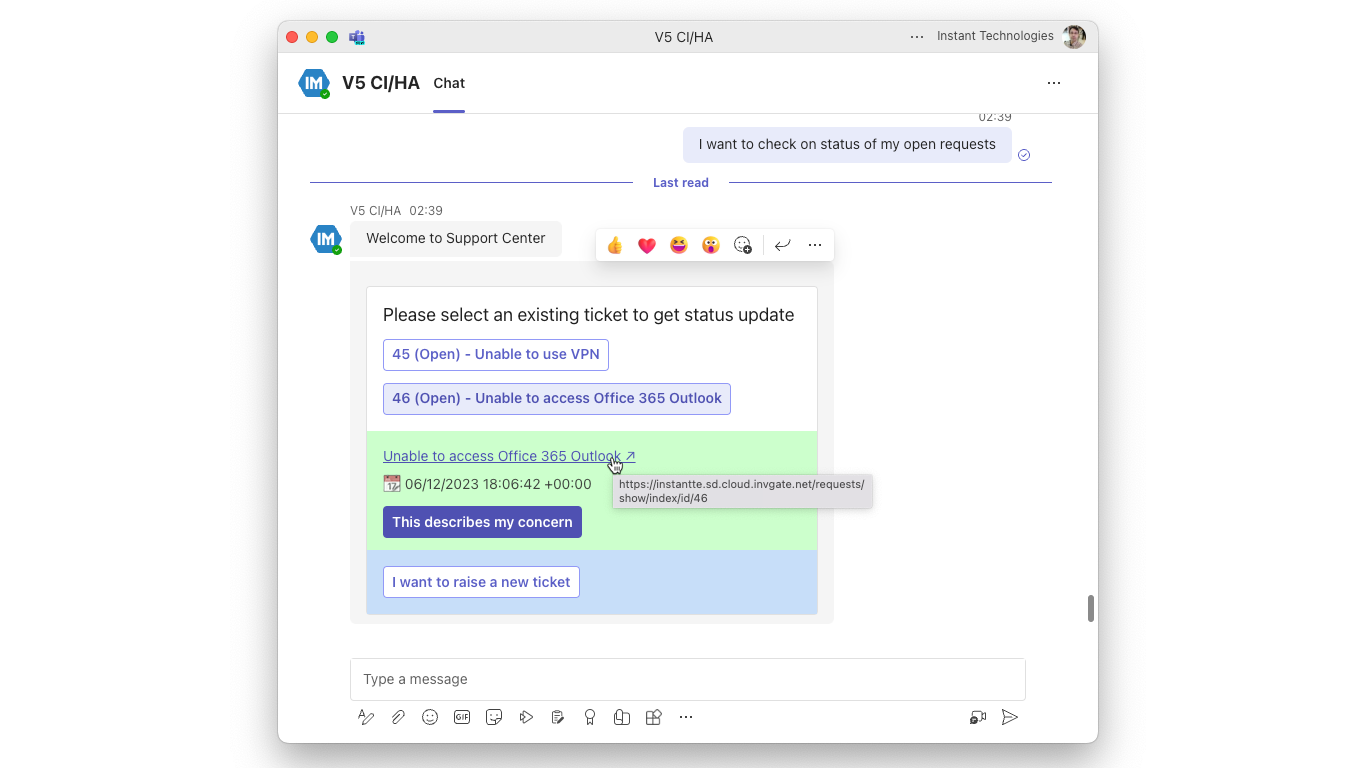
View Invgate tickets in your AI powered Teams chat
View tickets and associate them with your service desk chat session all from within Teams
Seekers can seamlessly associate incidents with chat sessions by selecting the relevant option, progressing to the next stage as configured in the pipeline.
Invgate Create or Update Ticket Pipeline Action
The Invgate Create or Update Ticket Pipeline Action empowers users to create new tickets or update existing ones. It assigns tickets to advisors and pushes chat transcripts to ticket records.
Invgate Ticketing Features
Invgate.Ticketing
Invgate.Pipeline.CreateTicket
Pipeline Configuration

Define Invgate fields for easy ticket creation within your service desk chat
Simplify the process of creating or updating tickets when chatting with your help desk
Notify seeker Invgate ticket is about to get created/updated: Customize the message to notify the seeker when a ticket is about to be created or updated.
Provide seeker Invgate ticket details: Configure the message to send seekers, including ticket number, ID, and URL.
Provide incident category: Configure the incident category Id
Provide incident priority: Configure the incident priority Id: 1 (Low), 2 (Medium), 3 (High)
Provide incident type: Configure the incident type Id
Assign incident to group: Configure the group Id
Evaluate JavaScript for Accessing Invgate Tickets
The Evaluate JavaScript action in the pipeline allows for versatile methods to access Invgate ticketing API calls, providing a convenient way to interact with tickets directly from Invgate chat sessions.
Invgate Ticketing Features
Before getting started, ensure the following feature is enabled:
- Invgate.Ticketing
Script Method - getInvgateTickets('seekerEmailAddress'): To retrieve a list of Invgate tickets, utilize the getInvgateTickets script call, passing the seeker's email address as a parameter.
// Get tickets
var tickets = getInvgateTickets("${Guest.Email}");
var ticketsArray = JSON.parse(tickets);

// Perform operations on ticket records
sendReply("Count of tickets: " + ticketsArray.length);
Script Methods for Ticket Manipulation: Leverage JavaScript Invgate helper calls to create and update tickets:
getInvgateTicket(seekerEmailAddress)updateInvgateTicketDescription(ticketId, description)assignInvgateTicket(agentEmailAddress)updateInvgateTicketTitle(ticketId, title)
Seeker Experience
The pipeline notifies seekers about impending ticket actions and provides them with necessary details, ensuring a transparent and user-friendly experience.
Ask questions and report issues in AI powered chat then easily create or update Invgate tickets
Streamline the process of reporting an issue and a help desk chat and creating or updating a ticket
Conclusion
Invgate's ticketing integration simplifies incident management, allowing organizations to easily handle and respond to incidents. It enables support teams to access, manage, and respond to tickets seamlessly, facilitating efficient communication and streamlining the support experience for users. By integrating Invgate into your workflow, you can optimize ticket management and enhance your incident management capabilities. Discover these features to fully leverage Invgate on your platform.
Related Items
To further enhance your understanding and utilization of the Invgate integration in Chime, here are some related resources:
Enhance Content Security With Role-Based Security in your Service Desk
Select What Roles Can View Specific Content
Safeguarding data is crucial and implementing effective access control for sensitive information is essential. Utilize the role-based authorization feature to address this need. This way, you make sure only the right people can access sensitive information.
Step 1: Navigate To A Content Item
First you will want to navigate to the content item you would like to set up role based access for. Common content items include FAQs, Pages, etc.
Step 2: Select the 'Security' Tab
When you open the 'Edit' content page navigate to the 'Security' tab at the top of the screen

Navigate to your service desk content’s security tab
The security tab is where role based access control is assigned
Step 3: Enabling Content Item Access Control
On the 'Security' tab select the check box to enable the content item access control. When selected it will show a list of roles.

Enable access control for a content item and select what roles in your service desk will have access
You can assign multiple roles for the same content item
Step 4: Choosing Roles for Access Control
From the list of displayed roles, make a selection.Choose the specific role that aligns with your security requirements. Once selected, only individuals with that role will have the privilege to view the content.
Common Roles in Chime V5:
Anonymous - Open access for anyone
Authenticated - Limited to individuals who have logged in or been authenticated
Agent - Exclusive access for agents only
Manager - Exclusive access for managers only
Administrator - Exclusive access for admins only
Role Hierarchy Clarification: When a Agent, Manager, or Admin role has been assigned it does not follow any role heirarchy. For example Admins will be unable to view content assigned exclusively to Agents or Managers.
Simplifying Login Domain Restrictions for your Service Desk
Define What Domains Have Access
This feature is designed to help you to control which Azure AD tenant can authenticate to your specified tenant. When logging in using Azure authorization, any Microsoft account user can log in, but only those within the designated 'Domains' will be able to authenticate and gain access to the tenant. Our step-by-step guide will provide you with all the necessary information to set up this feature and ensure that your tenant is secure and protected from unauthorized access.
Step 1: Accessing Login Domain Restrictions
Begin by navigating to the Chime User Management section. Look for the 'Login Domain Restrictions' option within the Admin menu. This is the starting point for configuring domain-specific access controls.
Step 2: Choosing Domain Access Options
Once in the 'Login Domain Restrictions' section, select the 'Allow Users From Only These Domains' option. This choice will enable you to specify the domains from which users are allowed to log in.

Settings Page for Login Domain Restriction
Allow one or more than one Azure AD tenant domain to login to your tenant
Step 3: Defining Allowed Domains
In the 'Allowed Domains' field, input the domains that should have access to your Chime tenant. Refer to the provided JSON data for the correct format. You can include multiple domains, each associated with a unique TenantId.
[
  {
    "DomainName": "Instant",
    "TenantId": "00000000-0000-0000-0000-00000000000"
  },
  {
    "DomainName": "Sandbox",
    "TenantId": "00000000-0000-0000-0000-00000000000"
  }
]
Step 4: Configuring Azure Active Directory
Move to Chime Settings > Azure Active Directory. Confirm that the TenantId is listed as 'common.' This setting is crucial for allowing users from other tenants to sign in, ensuring a broader scope of collaboration.

Azure AD Authentication Settings
Update or configure Azure AD Authentication settings, change App ID or change Tenant ID
Frequently Asked Questions (FAQs)
Can I add multiple domains in the 'Allowed Domains' field?
Yes, you can include multiple domains in the 'Allowed Domains' field. Ensure each domain follows the format specified in the JSON data provided in the setup guide.
How do I find my TenantId for Chime?
Refer to the JSON data provided in the setup guide. The TenantId is associated with each domain. Copy the relevant TenantId for configuration in Chime Settings > Azure Active Directory.
Note: If you face issues related to the redirect URL, follow the recommendation to add a new user from the tenant and register the user. This often resolves redirect URL concerns. In case issues persist, head to your Azure Portal and navigate to the Chime V5 app registration's redirect URL section. If the redirect URL for the specified tenant is not listed, manually add it for a comprehensive solution.
Create Real-Time Agent Chat Notifications For Your Teams Chat Channel
Add Incoming Chat Notifications To Your Chat Channel
Our platform is created to solve employee problems. Add a new chat channel, integrated with Microsoft Teams, and help resolve employee problems with your FAQs, integration with Microsoft SharePoint, or by using an advanced AI powered chatbot. Of course, if employees need to chat with your service desk, or HR department, then route to chat in real-time - and solve issues immediately.
This feature allows agents to receive real-time chat notifications in their Teams client when an employee’s chat request is routed to them, directly from the bot.
In this guide, we'll walk you through the setup process to ensure a seamless integration into your workflow.
Prerequisites
Before diving into the setup, ensure that you have the latest version of Chime V5 installed - or just install from the Microsoft Teams Store and start an evaluation.
Integration with Teams
Chime V5's real-time agent notifications are integrated into the features associated with routing inbound request to agents. Agents may receive notifications using a browser, via Microsoft Teams, or possibly using a Windows application. The Microsoft Teams channel webhook notification feature is also valuable and easy to configure.

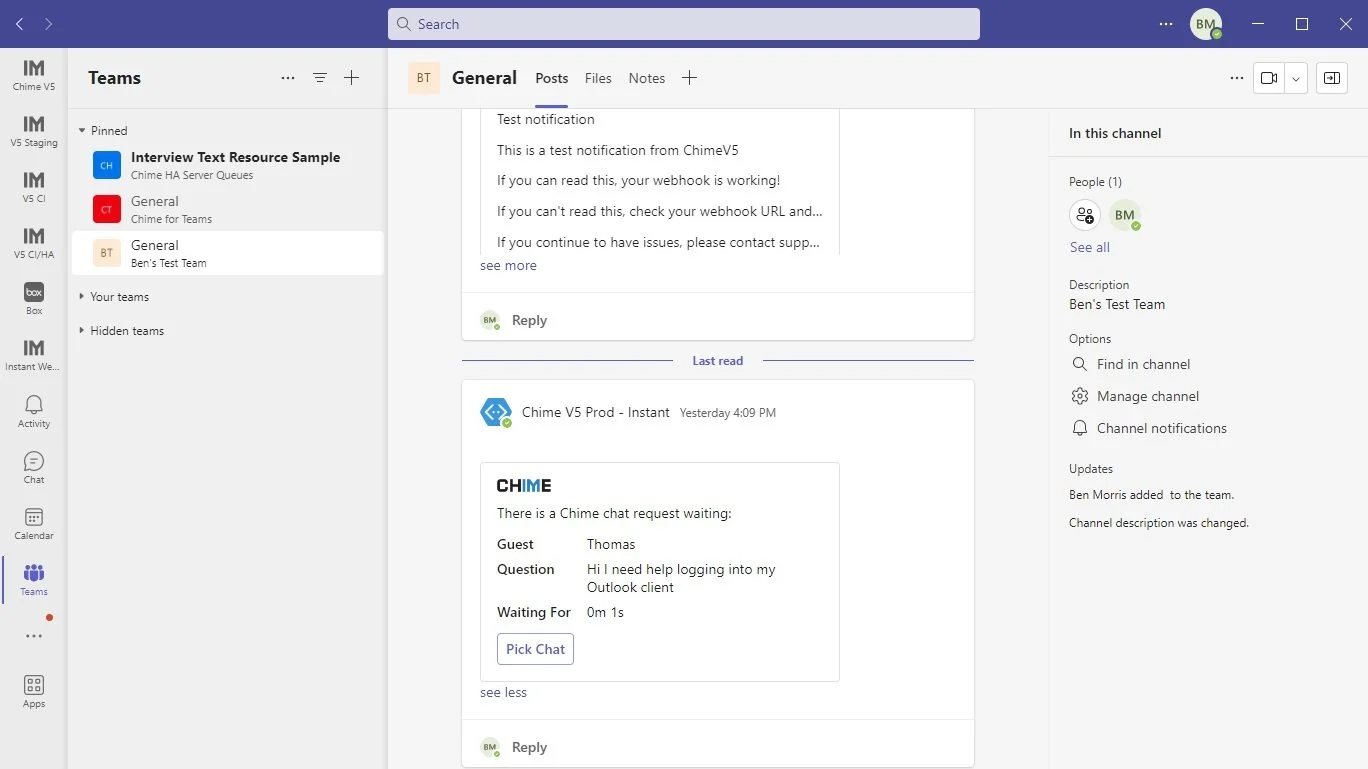
Enable the chat notification feature to notify agents of new chat requests
The chat notification feature is provided as an Orchard feature and is configured using the standard Orchard admin UI
Agents can now receive notifications in their Teams client when a chat is routed to them, in addition to the existing webhook method for routing into a Teams Channel.
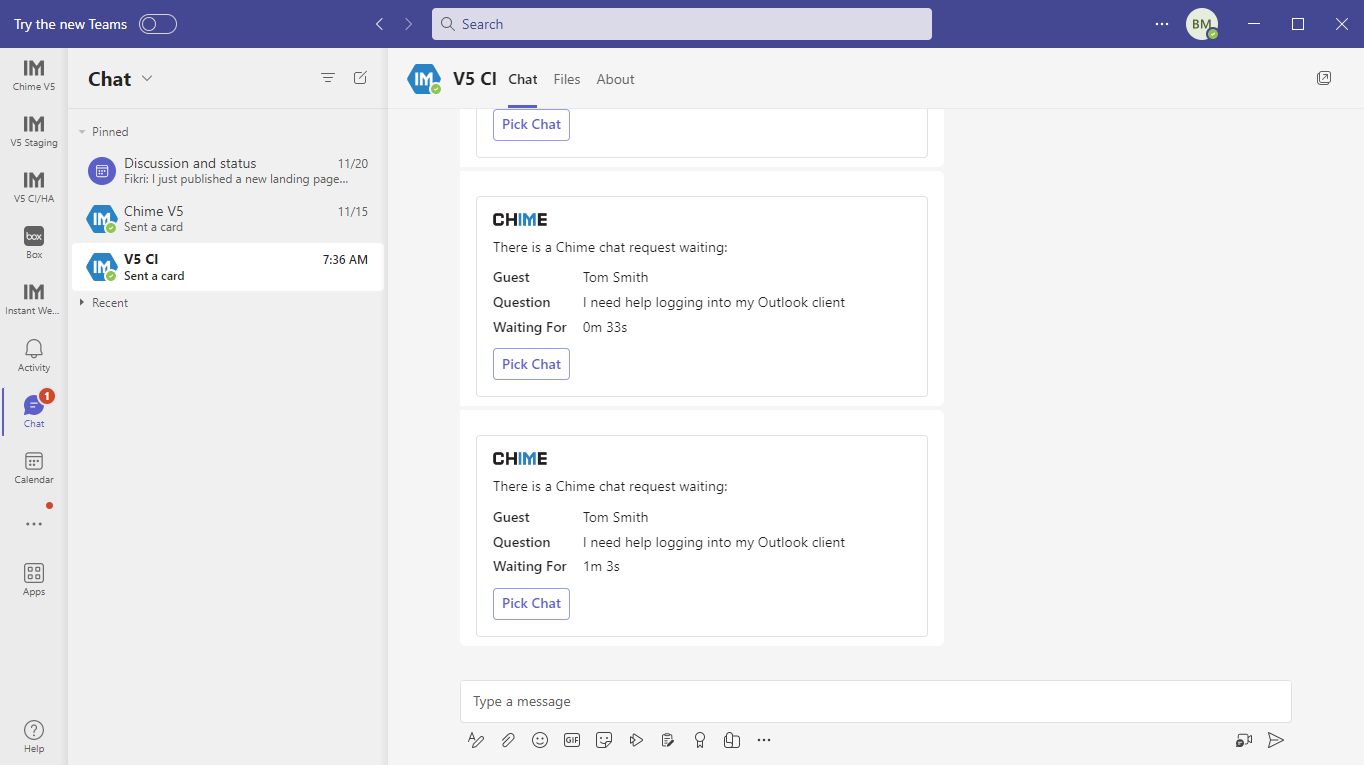
HR or IT Service Desk agents are now notified of chat requests using Microsoft Teams - so that they can quickly assist employees who need help
Build a chat based service desk using Microsoft Teams
User Settings Management
To enable these notifications, user settings must be configured to store the Teams ID and conversation ID reference for each agent. This information is added to the Orchard User record, similar to the setup for the Agent Profile.
User Settings in the Admin Area
In the Admin section, navigate to the user record, where a new "Teams Notifications" tab has been added. Here, administrators can manage Teams addresses for each user.

Enable service desk agents to receive chat requests
Configure agents to receive incoming chat notifications in Microsoft Teams

Create a chat based service desk - enable agents to help employees using Microsoft Teams
Build a chat based service desk using Microsoft Teams - here you just need to configure the notifications at the agent level
User Settings in Manager Area
For the Manager dashboard, a new section in the user page displays Teams notification settings. Managers can easily view and update this information when managing agents.

Use the agent profile to enable notifications in Microsoft Teams
Use the agent profile to enable notifications in Microsoft Teams - these notifications will be sent directly to the agent using MS Teams
User Settings for Agents
Agents can access their Teams notification settings on their Agent Dashboard Settings page. Additionally, buttons are available to Install Chime in Teams and Start Chat in Teams, facilitating the capture of Teams address information.

Our chat platform integrates into Microsoft Teams
Agents can control their own chat notification settings
Tenant-level Configuration
At the tenant level, administrators can configure additional settings to customize the Teams integration experience.
Tenant-wide enable/disable toggle: Easily enable or disable the feature for the entire tenant.
Override for the Teams App Id: Specify the App Id based on the installation method, ensuring seamless integration.
Adaptive Card Template: Customize the notification's appearance using an Adaptive Card Template.

Our chat platform uses Microsoft Adaptive Cards - including to send agent notifications
Microsoft adaptive cards are used in our chat platform - and we include the adaptive card designer - as well as adaptive card library
Sending Agent Notifications
With the setup complete, agents, having their Teams Addresses captured, will receive notifications in their Teams client when a chat is routed to them.
Example of sending a chat notification using Microsoft Teams
When you pick up a chat from within Teams it will open in a new browser tab
The implementation of this feature is seamlessly integrated into the Orchard Workflow events, requiring no changes to the chat pipeline. While it's not tied to Teams presence, agents need to have a Chime browser window open and be available to receive notifications.
Connect Service Desk To Teams Using Teams Workflow Integration
Broadcast Notifications Into A Teams Channel

Connect your enterprise service desk to Teams and receive notifications for agents
Link your service desk chat to a Teams channel and receive agent notifications to the channel
When employing Chime V5 pipeline activities, agents can receive notifications directly on their dashboard when new chat sessions arrive. By integrating Webhooks with Teams, these V5 workflows can be linked to a designated Teams channel, providing improved accessibility through broadcast notifications to Microsoft Teams.
Add Workflow for Webhook Requests to Your Teams Channel
Navigate to Your Teams Channel
Begin by navigating to the Teams channel where you want to receive broadcast notifications.
Select More Options Menu
In the chosen channel, click on the more options menu (three dots) located at the top-right corner.
Select Workflows

Navigate to Teams channel workflows
From the dropdown menu, select Workflows
Select “Post to a channel when a webhook request is received”

Select the “Post to a channel when a webhook request is received from the ‘Notify a team’ list
Click on the text of the list option to make a selection
Configure Workflow
Fill Out Workflow Name
Provide a meaningful name for the Incoming Workflow to easily identify its purpose. This will be the name that is displayed when a card is sent in the channel upon received webhook request.

Name your Workflow
Wait for your Microsoft Teams connection to verify before selecting Next
Create Workflow

Add the workflow to your Teams channel
Select the Add workflow button to add it to your channel and generate the Post request URL

Copy the newly generated Workflow URL
Once the URL is generated, click on the Copy button or manually highlight and copy the link.
Configure In Chime V5 Tenant
Navigate to Chime V5 Tenant
Open your Chime V5 tenant and access the chat pipeline.
Edit Chat Pipeline
Select the Edit option in the chat pipeline.
Connect to Agent Pipeline Item
Open the details for the Connect to Agent pipeline item.
Enable Webhook
Toggle the "Webhook Enabled" option to activate the webhook functionality.
Paste Webhook URL

Paste the Incoming Webhook URL into the ‘Connect to Agent’ chat flow stage
In the Webhook URL field, paste the previously copied URL from Teams.
Enable agent notification to Microsoft Teams using Webhook
Within the ‘Connect to Agent’ pipeline stage select the Webhook Enabled toggle to enable or disable channel notifications
User Experience for the Agent in MS Teams

View the Webhook Teams notifications for agents
Upon an incoming chat session, a broadcast notification is sent to the connected Teams channel
Related Content
Use Azure OpenAI And ChatGPT with Azure Cognitive Search
Create FAQ Chat App
Deploying a FAQ chatbot is a great way solve common issues and problems encountered by employees. Chime V5 provides a full FAQ system, with a chat service and connections to all Azure AI services. Deploy a Q&A chatbot, from the Microsoft Teams Store, to solve employee issues and immediately improve your existing service desk.
AI can create text, image, audio content, and produce enterprise FAQ chat bots and Q&A chat applications. Developers all across the world are incorporating AI into their applications for the benefit of their users. New AI models and SDKs pop out of the woodwork, it can be challenging for the enterprise to figure out how to get started and use it all especially when their curated content is located within SharePoint, ITSM knowledge bases or internal content management systems.
Microsoft Azure OpenAI offers high-performance AI models at a production scale, boasting industry-leading uptime. Complementing this, Chime provides enterprises with a platform to expediently leverage their pre-existing curated content to train Azure OpenAI models. Chime's chatbot understands natural human language and responds with content tailored to the enterprise, ensuring responsible, specific, and privacy-conscious interactions. Importantly, enterprises maintain complete control over the content delivered to their audience, preserving their unique brand identity and messaging. Here is an example of how Chime uses FAQs as part of a university deployment to populate ChatGPT chat responses as well as display a portal UI.
Bring Your Own Data: Azure OpenAI and Cognitive Search
Step 1: Preparation
Before you embark on this journey, ensure you have the following components ready:
Azure Storage Account: This serves as the repository for your data.
Azure Cognitive Search Account: The foundation for creating an index and enabling efficient searches.
Azure OpenAI Service: A crucial tool to utilize ChatGPT for enhanced responses.
Step 2: Creating an Azure OpenAI Service

Create a FAQ ChatBot and chat system using FAQs and Azure OpenAI with a cognitive index
Use our CMS to create a high value Q&A Chatbot, using your FAQs, to help answer employee questions and solve issues
Initiate the creation of an Azure OpenAI service, opening the doors to a world of possibilities. You can use the same service for all tenants in various environments or set up separate services based on your unique requirements.
Step 3: Creating a Azure Storage Account
Azure AI Playground is an easy way to build a FAQ Chatbot
Take advantage of new AI services, use your FAQs as content, and even import SharePoint articles to create a FAQ chatbot
Set up an Azure Storage Account, providing a structured foundation for data storage. You can create multiple storage accounts to segment data for different Chime tenants, but each tenant should have two uniquely-named Blob Containers within the same storage account.
Step 4: Create a Storage Container

Create an Azure OpenAI storage container to maintain the index
Lots of changes with Azure OpenAI but the work provides massive benefits and immediate value
Within your storage account, create an empty Blob Container. This container is pivotal for the Azure Cognitive Search setup, and it's crucial to assign a unique name to it.
Step 5: Adding a Seed Content File
To kickstart the creation of essential resources, add a "seed" file to the storage container. This file should be in HTML format and contain minimal content. Without this seed file, the Cognitive Search datasources, skillsets, and indexers won't be created.
Step 6: Creating an Indexer for the Container
Our FAQ chat system uses Azure OpenAI index as a tool to help answer employee questions
Index your company FAQs and KB to quickly create a Q&A chat service, in Microsoft Teams, to help answer common employee questions
Set up an indexer for the storage container. This indexer will periodically check for new documents in the container, ensuring that your knowledge base remains up to date.
Step 7: Creating a Cognitive Search Service

Powered By AI generally involves a cognitive index - as with most things, these are provided as tiers in Azure
We automatically deploy an Azure Cognitive Search index to create our chatbot service desk application -
Now, create a Cognitive Search service. You can choose the Basic tier to handle up to seven Chime tenants. This service will be used to build the knowledge base for ChatGPT.
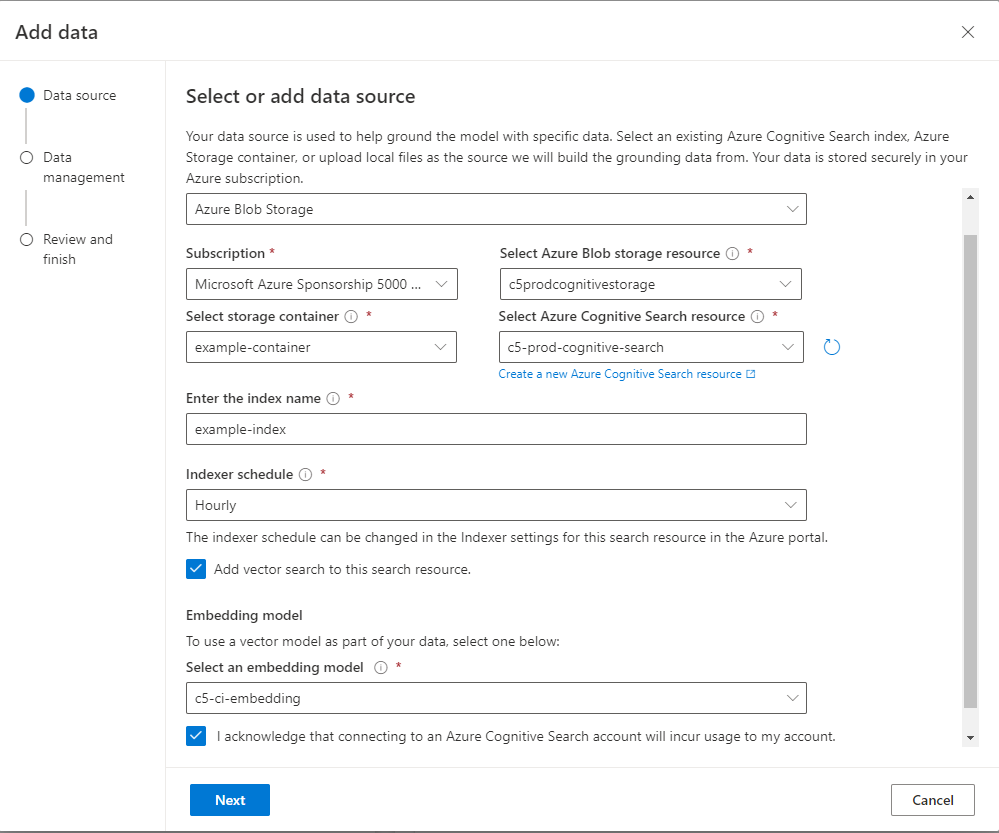
Step 8: Setting Up the Cognitive Search Service
Add the power of AI - or just index your FAQs - to add chat to your service desk
The Azure Cognitive Index is new and very powerful - it starts to incorporate OpenAI across Azure
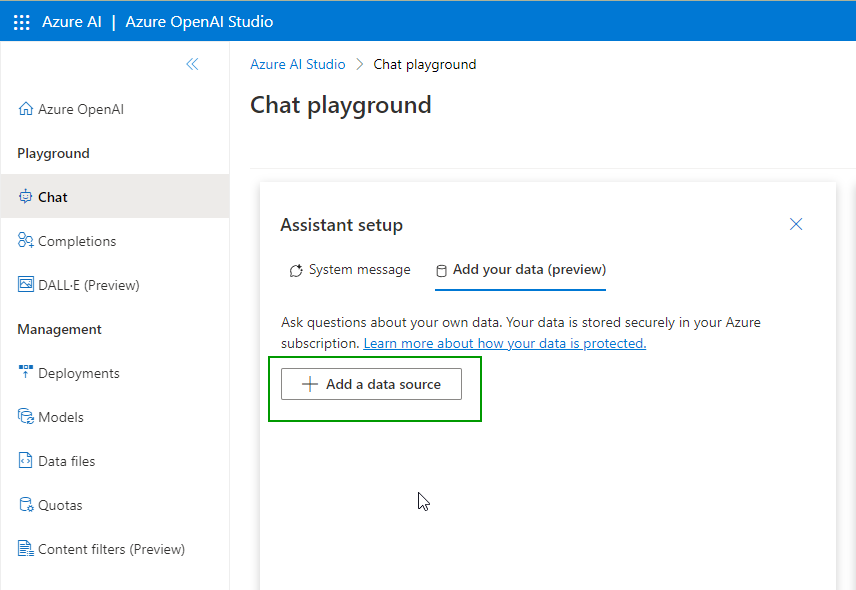
To configure the Cognitive Search service, you can utilize a user-friendly wizard available in the Azure OpenAI Chat Playground under the "Add your data (preview)" tab. Here, you'll need to connect your Azure Storage Account, Blob Container, and Cognitive Search service, streamlining the setup process.
OpenAI makes a high value addition to Azure
By combining a standard index, with a base LLM, FAQ chatbots are high value and easy to build using our product
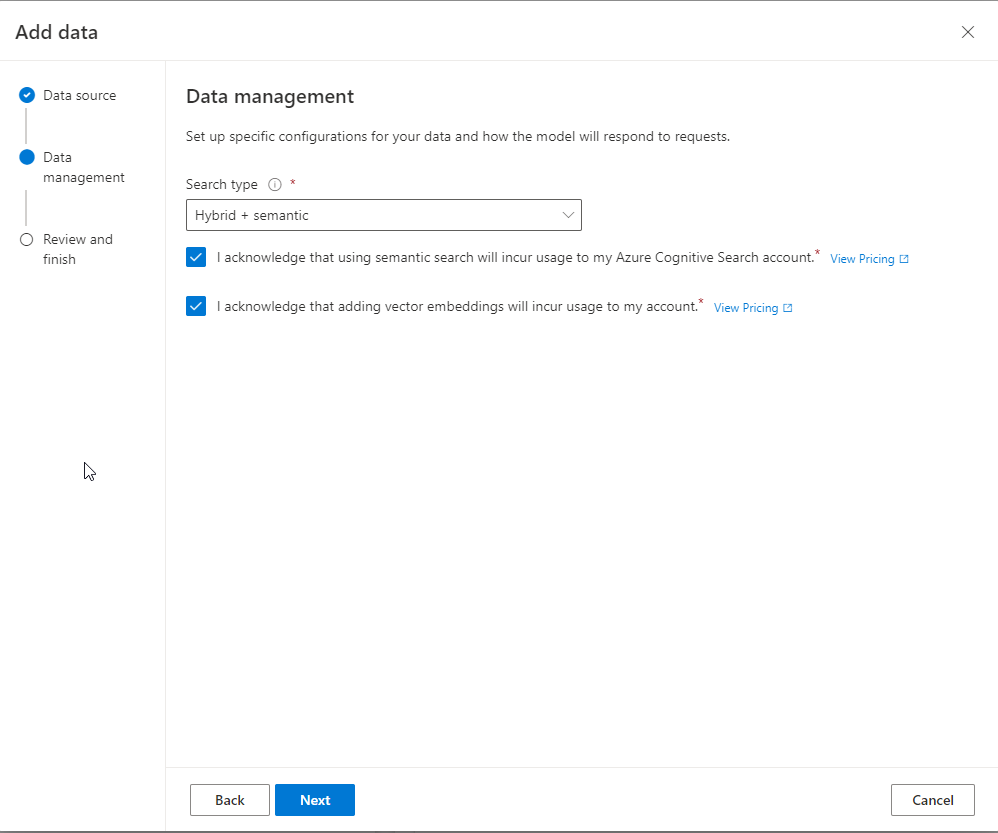
Enable various search types, including keyword-based searching, semantic search, vector search, and combinations of these.
For a comprehensive knowledge base, it's recommended to enable all available options.
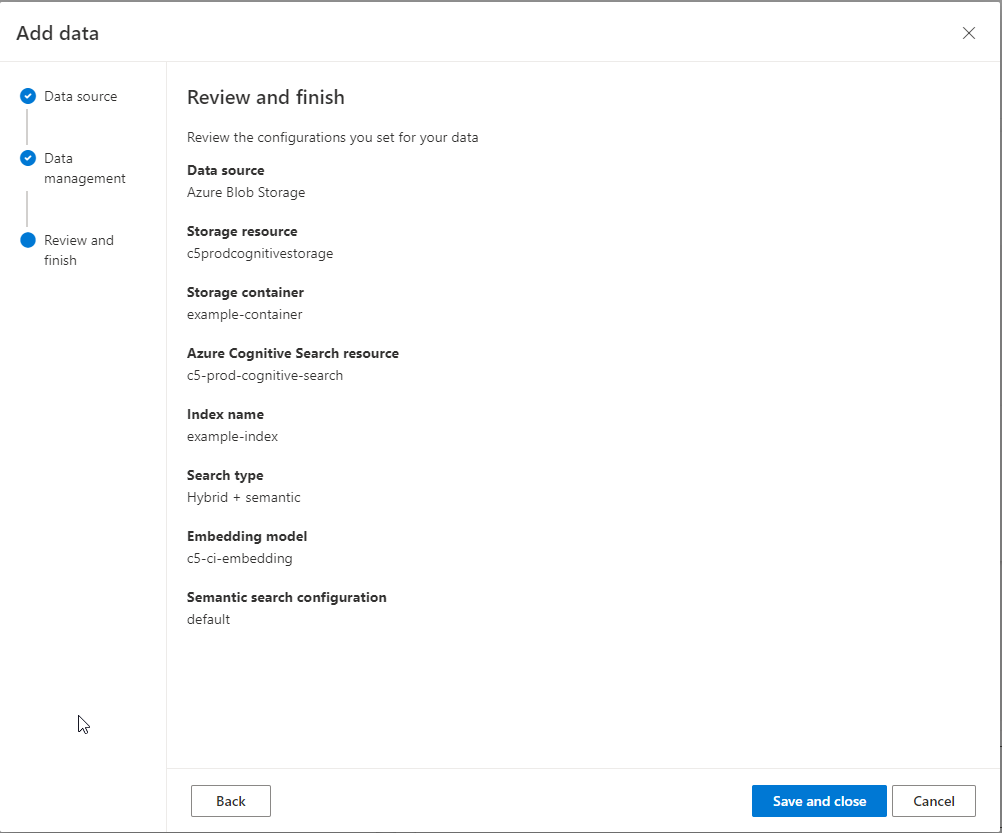
Review your selections and save the configuration. The Cognitive Search resources will be created.
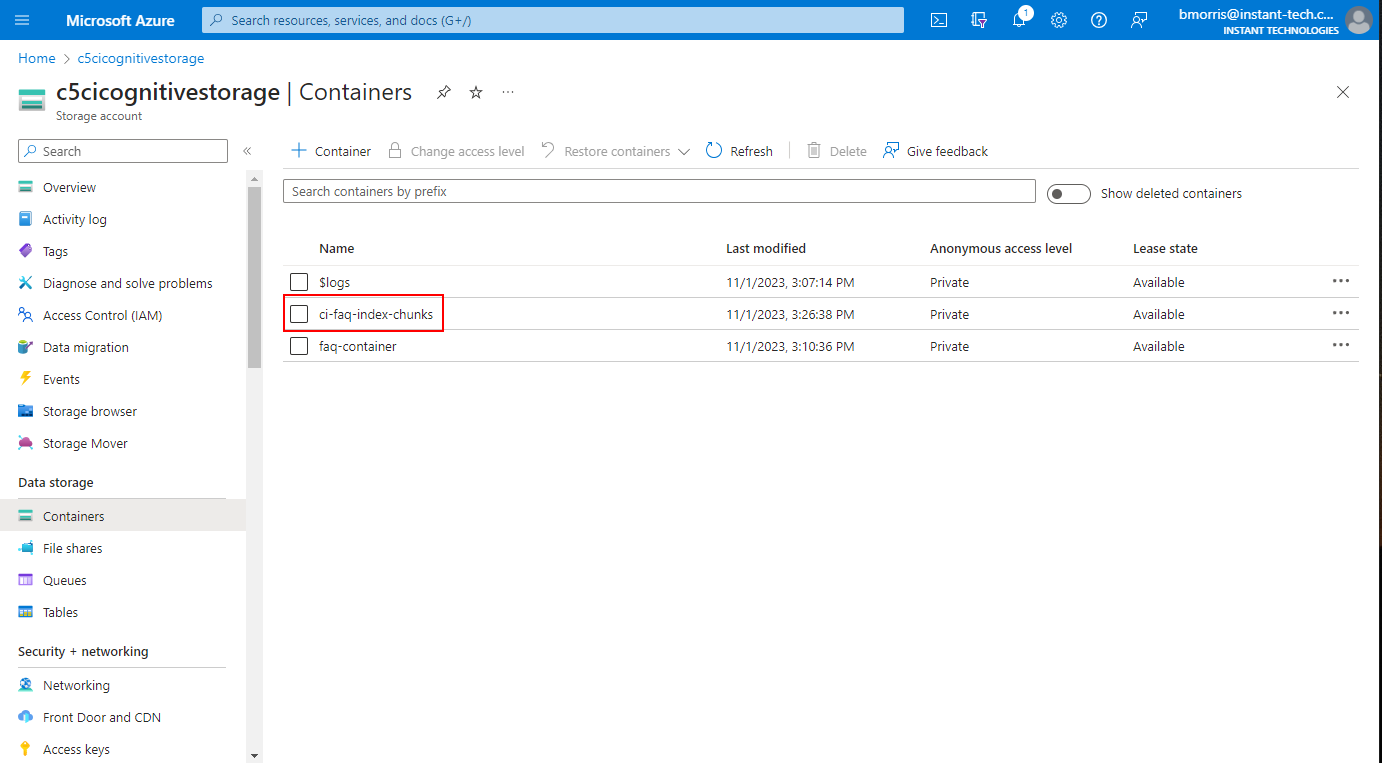
Step 9: Verifying Setup
After completing the setup, you should observe two storage containers in your Azure Storage Account: one for raw documents and another for indexed chunks. Additionally, in the Cognitive Search resource, data sources, indexers, skillsets, and indexes should have been created, signifying that your knowledge base is now operational.
Step 10: Configuring Cognitive Search Settings in Chime V5
With the Cognitive Search setup complete, it's time to configure Chime settings to enable this transformative feature.
Configure Upload Storage Account:

Connect your chatbot to Azure OpenAI
We provide all of the wiring, automatic indexing, and connections to connect your chatbot with Azure OpenAI
Provide the Storage Container name (e.g., example-container) and the Storage Connection String, which can be found in the Azure Portal under the Access Keys tab. Test the connection to ensure its functionality.
Configure Cognitive Search Index Settings:

Connect your Q&A chatbot to Azure OpenAI
Once connected, our application provides all data synchronization, index, queries to the large language model (LLC) to create a great chatbot
Provide the Cognitive Search Endpoint (visible in the Azure Portal's overview blade for Cognitive Search Service), Cognitive Search Key (admin key is required for full access), Index Name (use the augmented index, e.g., example-index), and optionally, the indexer name. Test these settings to ensure a successful connection, and then save the configuration.
Step 11: Cognitive Search Status Page

Provide the secret key to connect your chatbot to the Azure Cognitive Service
It’s your data, your index, and the chatbot will use your FAQs and SharePoint content to provide answers to your employees using chat
From the Cognitive Search Setting Page, you can access the Cognitive Search Indexing Status Page, which shows an overview of your connection to the Storage Account and Search Index, including the number of uploaded and indexed documents. If configured, it displays the last time the Search Indexer ran.
Step 12: Marking Chime Documents as Indexable

Mark your FAQs and have them automatically indexed for chat
Your chat service will now use FAQs for Q&A and help answer employee problems - just update your FAQs and your chatbot will improve
Each content item has metadata attached to track if it should be uploaded. Update content items, and the new version will be automatically uploaded and indexed.
Step 13: Force Reindexing from the Cognitive Search Indexing Status Page
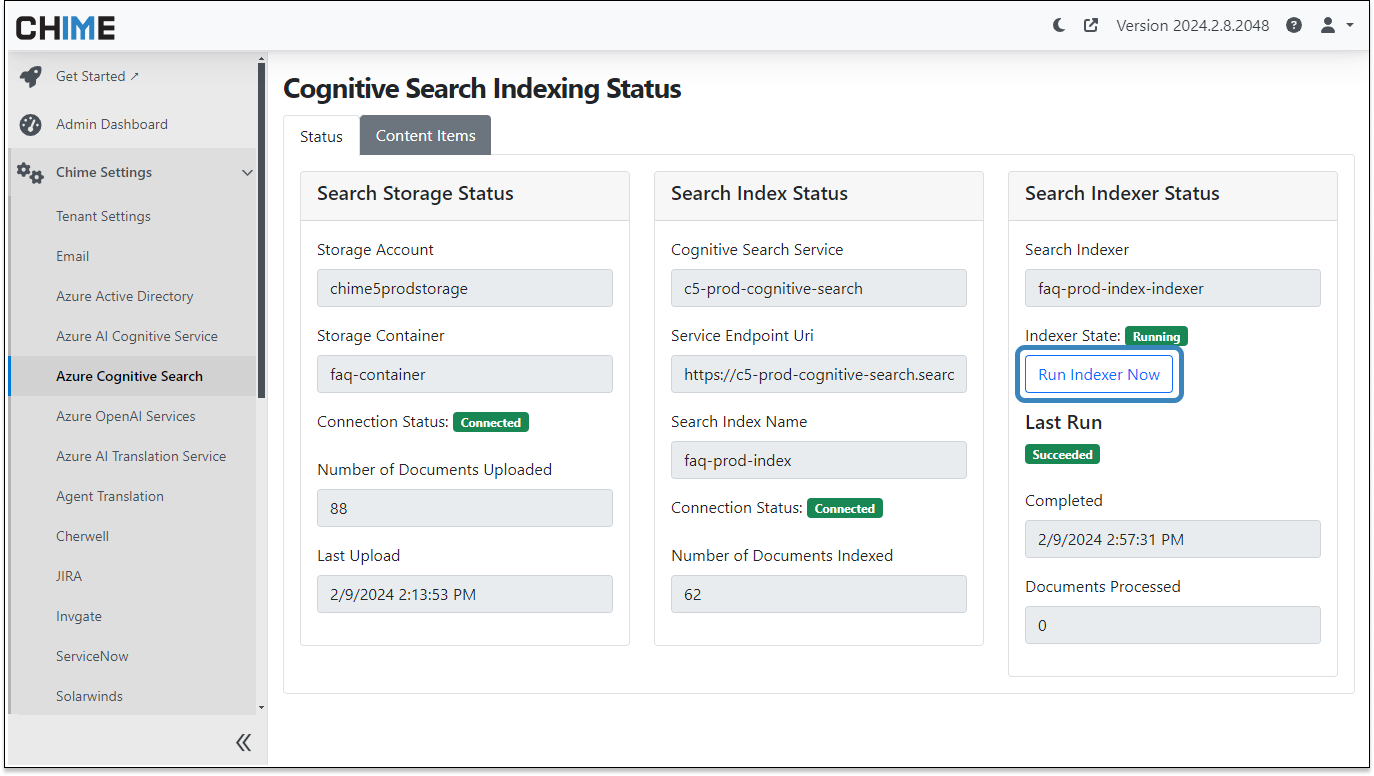
Index the latest knowledge base content in the Cognitive Search Indexing Status page
The indexer can be prompted to run within the service desk Admin UI Azure Cognitive Search settings
If you want to force the index to update, you can do it from the Cognitive Search Indexing Status page. Manually run the indexer to process new and modified documents in the datasource. Refresh to verify that the indexer has run and indexed the new document.
Step 14: Using Cognitive Search in the Chime Agent AI Chat Assist Feature
With Cognitive Search configured and FAQs indexed, you can enable Chime's Agent Assist feature to use indexed FAQ items in generating suggestions for agents.
Enable Cognitive Search in Agent AI Chat Assist Settings:
The first checkbox adds Cognitive Search to Chat GPT service calls.
The second checkbox ensures Chat GPT only uses information from indexed FAQ items. If no relevant information is found, it won't use the base model for responses.

Enable Cognitive Search in Agent AI Chat Assist Settings
Restrict whether your AI Chat Assist uses the base model for responses or only knowledge base content
Step 15: Cognitive Search Agent AI Assist in Action
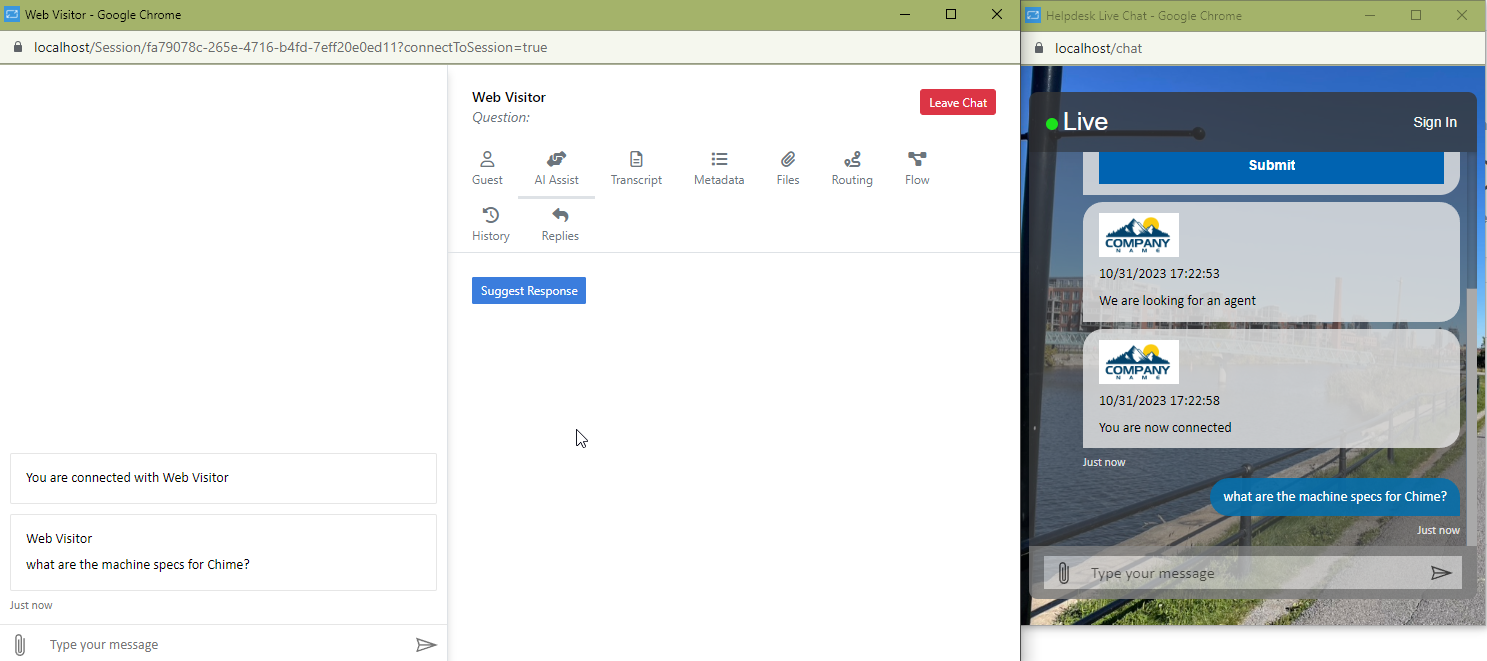
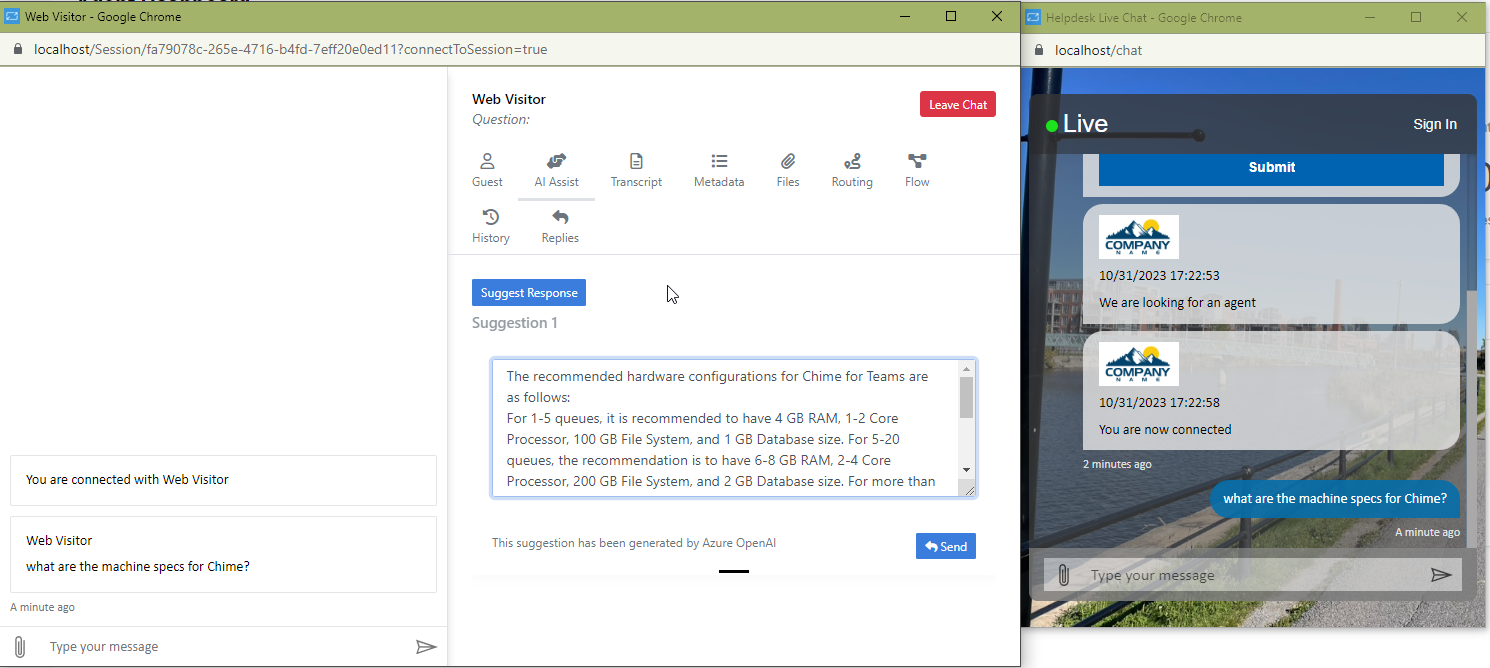
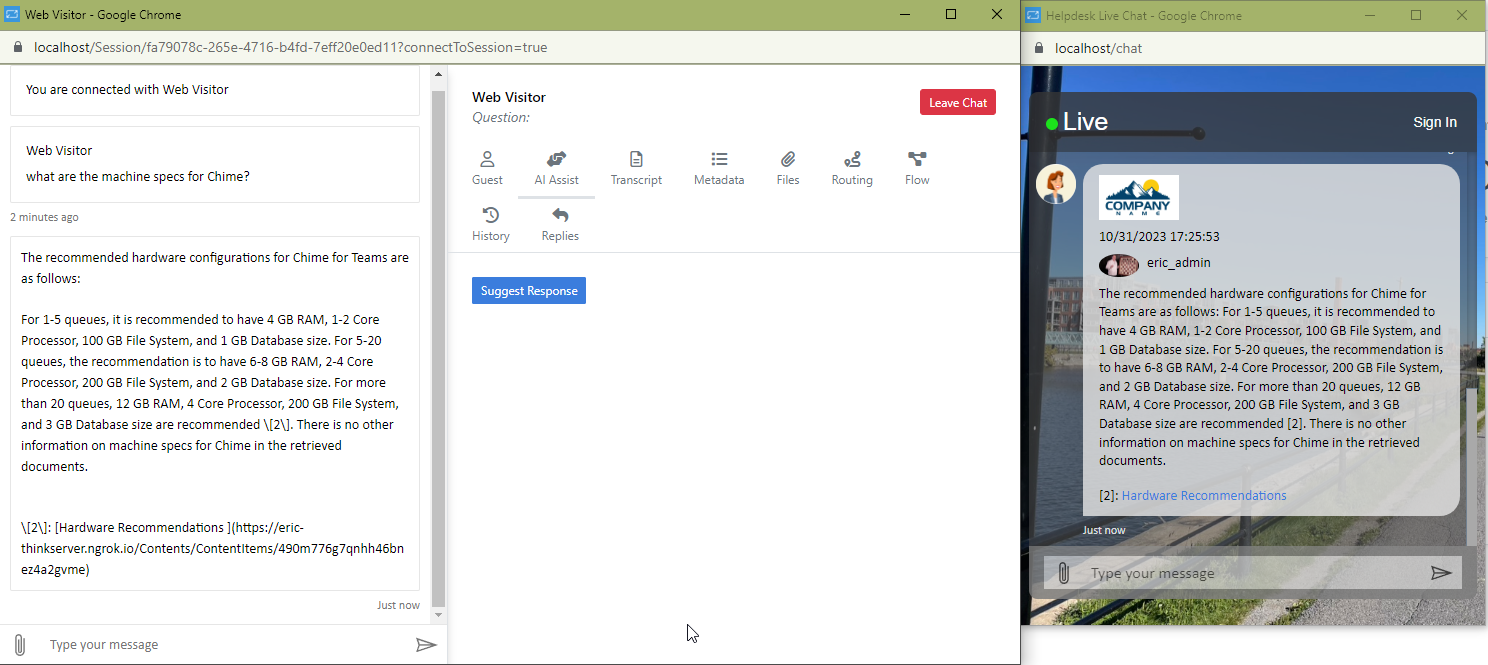
With FAQs indexed, Chat GPT can provide responses that include information from the indexed documents, along with a link to the original FAQ for reference.
Step 16: Using Cognitive Search with the Chat GPT Pipeline Stage

Enable Cognitive Search for responses from the service desk chatbot
Responses can be restricted to only knowledge base content
You can also enable the Chat GPT pipeline chatbot to use indexed knowledge base items. With these settings enabled, the chatbot can respond based on the knowledge base, ensuring more accurate and relevant responses to guest queries.
Step 17: Customizing your ChatGPT & Cognitive Search Experience

Configure chatbot response settings for the Chat GPT model in the service desk chat flow
This is the area where length, number of responses generated, randomness, and creativity can be adjusted
Set custom parameters from a list of advanced parameters for the Chat GPT Model:
Choice Count: Specifies the number of alternate responses to return for a prompt.
Max Tokens: Defines the maximum number of tokens to generate in the response.
Temperature: Sets the sampling temperature, influencing the apparent creativity of generated completions. Higher values result in more randomness, while lower values lead to more focused and deterministic results.
Top P: Governs the randomness of the response. Lower values make the response more deterministic.
Frequency Penalty: Regulates repetition in the response. Positive values decrease the likelihood of tokens appearing as their frequency increases, reducing the model's tendency to repeat the same statements.
Presence Penalty: Manages repetition in the response. Positive values decrease the likelihood of tokens appearing when they already exist, thereby increasing the likelihood of the model outputting new topics.

Configure the Cognitive Search query FAQ search strictness and how referenced content displays in service desk chat
Enable or disable the MS Teams client pop-up task module window to display referenced FAQs
Set additional Cognitive Search settings to allow for a custom user experience when referencing your documentation.
Restrict Bot Responses to Knowledge Base: When enabled, the chatbot will exclusively suggest responses based on information retrieved from knowledge base resources such as FAQs. If no relevant resources are found, the user will be informed. When disabled, the chatbot can also respond using data from its base model if no relevant information is available in the knowledge base.
Strictness: This parameter determines how closely the chatbot matches searched documents to the user's query. Increasing the value raises the threshold for relevance, filtering out less-relevant documents for responses. Setting this value too high may limit the model's ability to generate responses due to a scarcity of available documents.
Maximum Retrieved Documents: Defines the maximum number of top-scoring documents provided to the chatbot as background information to generate a response. Increasing this value may enhance the quality of responses, particularly if there are numerous short documents in the knowledge base.
Search Query Type: Users can choose between 'Simple' and 'Semantic' search query types.
FAQ Citation Link Options: Users can opt to display cited documents as footnotes, where URLs are included at the end of the message, inline within the response, or choose not to link the source documents at all.
Conclusion
Enriching your AI models with your data using Azure Cognitive Search is a powerful method to enhance the accuracy and relevance of responses. By following these comprehensive steps, you can set up the integration of Azure Cognitive Search with Azure OpenAI ChatGPT to create a more informed and capable AI assistant for your Chime V5 platform. This not only enriches the guest experience but also makes your agents more efficient in providing information and support.
Related References
How to Choose the Right Chat Base Enterprise Help Desk Solution for Your Business

AI Assistance Within Microsoft Teams for Enterprise
AI chat-based help desk solution example of solving password reset (integrated in Microsoft Teams)
1. Introduction
Selecting the right help desk solution impacts both customer support and overall business operations. Here's why a help desk system is essential, as highlighted by Atlassian (https://www.atlassian.com/itsm/service-request-management/help-desk):
Email Isn't Enough: Relying on email for support requests is messy and inefficient. A Help desk software organizes and prioritizes queries, ensuring none fall through the cracks.
Employees Want Self-Service: Today's employees value autonomy. A help desk system often incorporates AI, FAQs and knowledge bases, letting customers find answers without waiting for a response.
Track Support Performance: Understanding your support's performance is important. With the right software, you can monitor metrics like ticket volume, resolution speed, customer satisfaction, and agent performance.
Leveraging AI for Efficiency: Modern help desks use AI to automate responses, route tickets effectively, and predict potential issues.
This guide will help you choose the right help desk solution for your business.
2. Understand Your Needs
Choosing the right help desk solution starts with understanding your business's requirements.
2.1. Assessing Your Current System:
Examine the current system in use. Employees might face certain issues, the ticket process might not be intuitive, and there could be integration challenges with other company tools.
Questions to Consider:
Are employees content with the current system?
What challenges does the current system present?
Are there unused or unnecessary features in your current system?
2.2. Forecasting Future Growth:
Think about your future needs. As your business grows, the number of support queries will likely increase.
Questions to Consider:
Where do you expect your business to be in a few years?
Will the help desk need to integrate with new tools or departments?
How quickly might the volume of support requests grow?
2.3. Listing Essential Features:
There are many features in help desk systems. Focus on what is essential for your business.
Questions to Consider:
What features are a must-have for your system?
Which features are secondary but still useful?
How do employee needs influence your feature choices?
By addressing these questions and understanding your needs, you'll be better prepared to select a suitable help desk solution for your business.
3. Key Features to Consider
When selecting a help desk solution, it's crucial to zero in on features that align with your business needs. Here's a breakdown of some key functionalities to consider:
3.1. Ticket Integration:
Automate your ticket management. By automating ticket creation and management, you can ensure a more streamlined and timely response to employee queries, reducing manual overhead and the potential for errors.
3.2. Integration Capabilities:
A robust help desk system shouldn't operate in isolation. It needs to seamlessly integrate with other tools and software used within your enterprise. For instance, consider the benefit of integrating with Microsoft Teams. This platform, already familiar to many employees, can be leveraged to enhance communication and collaboration around support tasks.
3.3. Reporting and Analytics:
Insights drive improvement. A good help desk solution will provide comprehensive tools to assess performance, from ticket resolution times to user feedback. An essential feature to consider is custom reporting. This allows businesses to create custom reports, querying specific data sets that align with their unique operational metrics.
3.4. Customization:
No two businesses are the same, and your help desk software should reflect that. The ability to customize the system—from the web client user interface to workflow automation—ensures that the tool aligns closely with your specific business operations and needs.
By focusing on these features, you can ensure that your chosen help desk solution not only addresses your immediate requirements but also positions your business for future growth and challenges.

Create reports from your chat workflow helpdesk
Help desk reports graph UI: Rendering connected inbound chats over time
4. Consider User Experience
To maximize the efficiency and effectiveness of your help desk system, prioritize user experience. A user-friendly system speeds up tasks and reduces frustration, benefiting both your support team and the end-users they assist.
4.1. Intuitive Interface:
Opt for a system with a clear and straightforward layout. Simple navigation means less time searching for functions and more time resolving issues. When evaluating options, think about whether a new team member could quickly get the hang of it. If it seems complicated, users might avoid or misuse essential features.
4.2. Chat-Based Support:
Integrating chat into your help desk system offers numerous advantages. Chat provides real-time interaction, allowing for immediate clarification and faster resolution. Users often prefer chat because of its convenience and the instant feedback it provides. For support agents, chat can be more efficient than phone or email, as they can handle multiple chat sessions simultaneously.
4.3. Self-service Options:
Empower users by providing self-service options. A comprehensive knowledge base, FAQs, and integrated AI chatbots allow users to find answers on their own. This not only reduces the workload for support agents but also gives users the satisfaction of resolving issues without having to wait for assistance.
4.4. Agent-Assist AI:
Leveraging AI to assist support agents can be a game-changer. Agent-Assist AI provides real-time suggestions to agents, helping them address queries more efficiently. By analyzing the context and history of conversations, AI can recommend solutions, draft responses, or even automate repetitive tasks, enabling agents to focus on more complex issues and improve overall response times.
5. Implementation and Migration
The migration should be smooth, with minimal disruption to your ongoing operations. Here are some key areas to focus on:
5.1. Onboarding:
Effective onboarding introduces your team to the new system's tools and processes. Collaborate with the software provider to understand the onboarding tools they offer, such as tutorials or interactive guides, and ensure that your team feels comfortable and confident with the new system from day one.
Onboarding Checklist:
Onboarding Tools: Explore and use the tools provided for a smooth onboarding process.
Integration Testing: Ensure the new system integrates seamlessly with your existing tools.
User Training: Schedule sessions to get your team acquainted with the new system.
Time Frame Agreement: Establish a timeline with the software provider for the entire onboarding process.
Feedback Mechanism: Set up a system for collecting feedback in the early stages of the new system's use.
System Tweaks: Make adjustments based on feedback and initial usage for optimal performance.
Continuous Monitoring: Monitor the system's performance during the initial weeks to address any issues promptly.
5.2. Integration with Current Tools:
Your new help desk system should seamlessly integrate with the tools you already use, like CRM software, communication platforms like Microsoft Teams, and other essential software like ServiceNow. Proper integration streamlines operations and reduces potential errors.
5.3. Time Frame:
Onboarding to a new system takes time. Set realistic expectations for how long it will take to get your team fully acclimated. A clear timeframe aids in planning and minimizes disruption. Engage with the software provider to determine a precise timeline.
6. Testing
It's essential to test the before making a full commitment. Here's how you can approach it:
6.1. Free Evaluations/Trials and Demos:
Many help desk software providers offer free trials or demo versions of their platforms. Utilize these opportunities to get a hands-on experience with the software. It allows you to test its capabilities, user-friendliness, and how well it aligns with your business needs.
6.2. Engage Your Team:
Your support team will be the primary users of the help desk system. It's crucial to involve them in the evaluation process. Let them test the software, use its features, and simulate real-life scenarios. Gather their feedback regarding ease of use, functionality, and any potential challenges they foresee. Their insights can be invaluable in making an informed decision.
Testing Checklist:
Trial Signup: Register for any available free trials or demo versions of the software.
Feature Exploration: Familiarize yourself with the main features and functions during the trial.
Real-life Simulation: Try simulating real support scenarios to evaluate system performance.
Team Involvement: Ensure multiple team members, especially those who will use the system frequently, participate in testing.
Feedback Collection: Set up a mechanism to gather detailed feedback from team members during the trial period.
Integration Test: Check how well the system integrates with your current tools during the trial.
Performance Metrics: Monitor any available performance metrics or analytics during the trial.
Support Inquiry: Test the responsiveness and quality of the software provider's support during the trial.
Decision Meeting: After the trial, hold a team meeting to discuss experiences and decide on the next steps.
7. Conclusion
Selecting the right help desk solution is more than just ticking off a list of features. It's about ensuring that the software integrates easily into your business operations, empowering your team to deliver the best support. The choices you make will have long-term implications for your team's efficiency and, ultimately, the satisfaction of the users they assist.
Taking shortcuts in the selection process can lead to challenges down the line. Therefore, it's important to invest time in thorough research, hands-on testing, and team feedback.
By approaching this decision with the care and diligence it deserves, businesses can ensure they choose a help desk solution that truly aligns with their unique needs and goals.
Accessing Chime Reports With Power BI
How to Retrieve Data from Chime Using a Blank Query
Introduction
In this article we will provide an example using Microsoft's Power BI to retrieve data from the Chime for Teams reporting API. Chime provides a reporting API, with token level access, in order to assist developers with creating external portals, dashboards, and custom reports.
The Power BI integration will use:
Chime reporting APIs to retrieve CSV based reports from Chime
Power Bi Desktop Application to configure data queries and reports
Reports may be requested at the Chime queue level or from global Chime reports (data across queues)
Before Getting Started
First you will want to have a decent understanding of the chime reporting API and how to generate credentials and charts. You can find information on the chime reporting API here: https://teaminstant.visualstudio.com/Chime-Public/_wiki/wikis/Chime-Public.wiki/181/Chime-Reporting-API.
Background on Microsoft Power BI Desktop App
You will want a basic understanding of Power BI and an installation of Microsoft Power BI Desktop.
In order to configure advanced data connectors, please download the Microsoft Power BI desktop application here: https://powerbi.microsoft.com/en-us/downloads/
How to retrieve data from Chime
First, after installing Microsoft Power BI Desktop, You will want to start a new project by selecting File > New from the starting page.
Method 1: Blank Query & Advanced Editor
Select "Get Data" followed by "Blank Query" and then Advanced Editor.

Set up blank query

Power BI Advanced Editor
Select the Advanced Editor option
Simply paste this cURL example:
let
    Source = Web.Contents(
        "{{baseUrl}}/Chime/Report/InboundVsAnsweredChats?queueId=1&start=2020-11-01T04:00:00.000Z&stop=2020-12-01T04:59:59.999Z&csv=true",
     [
        Headers = [
            #"Method"="GET",
            #"Authorization"="Bearer 0000000-0000-0000-0000-000000000000"
            ]
            ])
in
    Source
Select ‘Done” on the following page and you will generate an inbound vs answered report with the specified date ranges.

Query Table Power BI
Method 2: Web Query & Advanced Editor
To create a connector to chime, select "Get Data" and then "Web"

Select your data source in Power BI
Select to import data from a web page
You will need a URL to the report you would like to generate. Refer to the chime reporting API documentation here to learn how to construct this URL: https://teaminstant.visualstudio.com/Chime-Public/_wiki/wikis/Chime-Public.wiki/181/Chime-Reporting-API.
We will use the following values in the advanced tab.
Chime report URL: {{baseUrl}}/Chime/Report/InboundVsAnsweredChats?queueId=1&start=2020-11-01T04:00:00.000Z&stop=2020-12-01T04:59:59.999Z&csv=true
We will add Headers for:
Method / get
Authorization / Bearer 0000000-0000-0000-0000-000000000000
Configure the next window like this:

From Web Configuration Power BI
In this example we have generated the Inbound vs. Answered chart.
Using DAX to get data using dynamic ranges
Once we have generated the report in Power BI We will do a bit of extra coding in the DAX language to add the ability to get data based a dynamic range of dates. In this case we will set the date range from yesterday to now. This way when you check the report it will update with recent data.
To do this we will select "Transform Data" and then "Advanced Editor" in the following window.
Transform Data Power BI
We will enter the following DAX query on the advanced editor page:
let
    #"todaystring" = Date.ToText(DateTime.Date(DateTime.LocalNow())),
    #"daybeforestring" = Date.ToText(DateTime.Date(Date.AddDays(( DateTime.LocalNow()),-1))),
    #"ChimeURL" = "{{baseUrl}}/Chime",
    #"ReportExtension" = "/Report/InboundVsAnsweredChats",
    #"QueueID" = "?queueId=1",
    #"SourceUrlString" = #"ChimeURL" &#"ReportExtension" &#"QueueID" &"&start=" &#"daybeforestring" &"&stop=" &#"todaystring" &"&csv=true",
    Source = Csv.Document(Web.Contents(#"SourceUrlString", [Headers=[Method="get", Authorization="Bearer 0000000-0000-0000-0000-000000000000"]]),[Delimiter=",", Columns=5, Encoding=65001, QuoteStyle=QuoteStyle.None]),
    #"Promoted Headers" = Table.PromoteHeaders(Source, [PromoteAllScalars=true]),
    #"Changed Type" = Table.TransformColumnTypes(#"Promoted Headers",{{"Date UTC", type datetime}, {"Inbound Chats", Int64.Type}, {"Answered Chats", Int64.Type}, {"Queue Unavailable Chats", Int64.Type}, {"Deflected Chats", Int64.Type}})
in
    #"Changed Type"
In the query above we are using the following variables to construct our cURL call to the chime reports api.
todaystring (will get todays date)
daybeforestring (will get yesterdays date)
ChimeURL (The URL of the chime server we are hitting)
ReportExtension (The report we would like to fetch)
QueueID (the ID of the queue we are hitting)
Once the string is concatenated we are adding the required get and authorization headers.
When you select "Done" your report will now update dynamically.
DAX (Power BI's supported language) is a robust language and you can read more about different things you can do here: https://docs.microsoft.com/en-us/dax/#:~:text=Data Analysis Expressions (DAX) is,Pivot in Excel data models .
Once you log in to the Power BI Windows application, you can publish the report up to your Power BI account / workspace.
Related Items
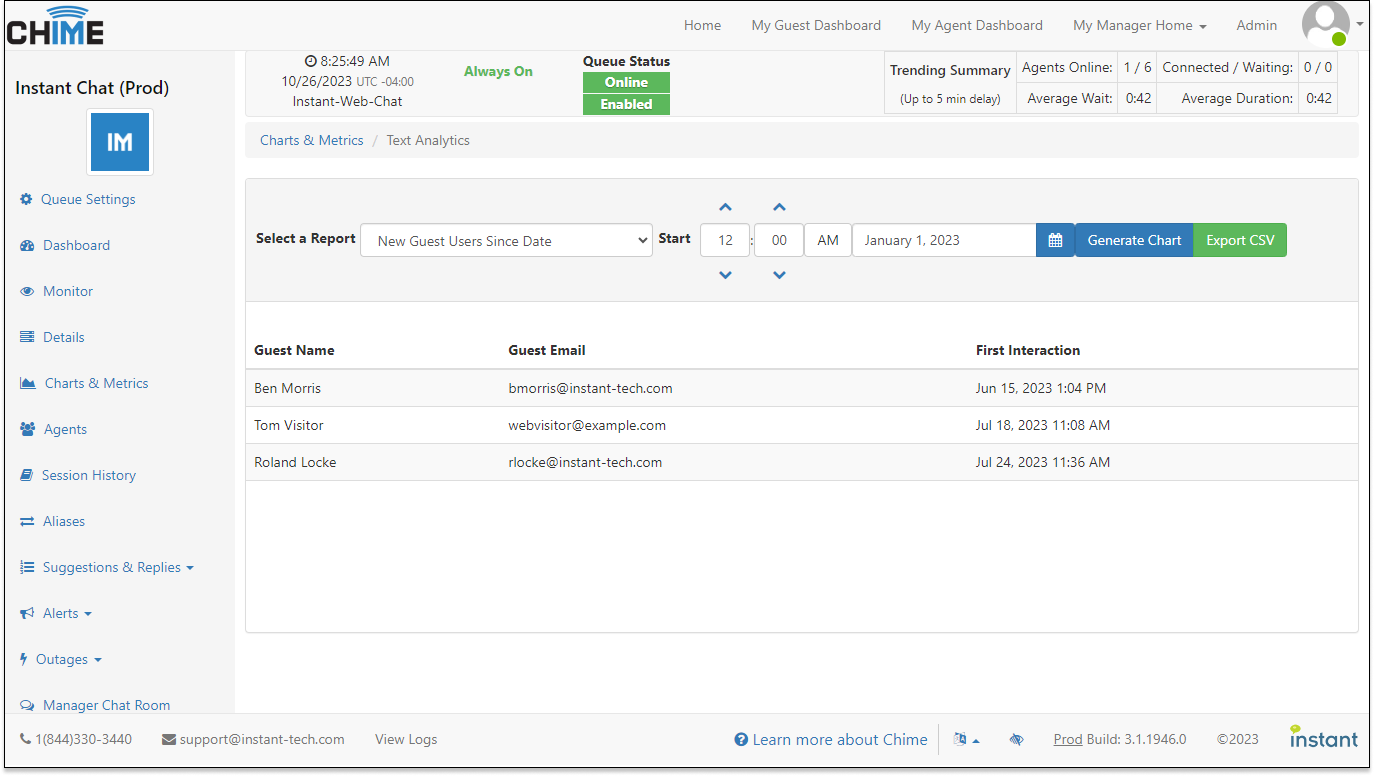
Your Guide to Accessing ‘New Users Since Date’ Report in Chime V4
Many of our customers would like to understand the adoption rate as new employees start to use Chime as a chat based service desk. In many cases, this is driven by internal corporate KPI metrics - and the requirement to determine exactly how many employees are using a newly deployed software application.
This article provides essential information on accessing the 'New Guest Users Since Date' report both in the Chime UI and via the API. Here, you'll find details about the report's URL, API endpoint, and example code to effectively generate this report.
Accessing the 'New Guest Users Since Date' Report in Chime UI
How can I access the 'New Guest Users Since Date' report in the Chime UI?
To access the 'New Guest Users Since Date' report in the Chime UI, follow these steps:
Log in to the Chime web portal using your credentials.
Navigate to the Reports section.
Locate the 'New Guest Users Since Date' report and click on it.
Specify the desired date for filtering and generate the report.
Accessing the 'New Guest Users Since Date' Report via the API
How can I access the 'New Guest Users Since Date' report using the API?
You can access the 'New Guest Users Since Date' report through the Chime V4 Reporting API. The API endpoint to retrieve this report is as follows:

View the ‘New Guest Users Since Date’ report in Charts & Metrics
The ‘New Guest Users Since Date’ report can be found under the ‘Text Analytics’ category
Global Report URL:
https://example.com/Chime/Report/NewGuestsSinceDate_Global
Queue Report URL:
https://example.com/Chime/Report/NewGuestsSinceDate
You'll need to use the API key for authentication. Here's how you can use it in your requests.
Example Code
CURL
curl --location --request GET 'https://example.com/Chime/Report/NewGuestsSinceDate_Global?start=2023-01-01&csv=true' \
--header 'Authorization: Bearer YOUR_API_KEY'
jQuery
var settings = {
  "url": "https://example.com/Chime/Report/NewGuestsSinceDate_Global?start=2023-01-01&csv=true",
  "method": "GET",
  "timeout": 0,
  "headers": {
    "Authorization": "Bearer YOUR_API_KEY"
  },
};

$.ajax(settings).done(function (response) {
  console.log(response);
});
Nodejs
var request = require('request');
var options = {
  'method': 'GET',
  'url': 'https://example.com/Chime/Report/NewGuestsSinceDate_Global?start=2023-01-01&csv=true',
  'headers': {
    'Authorization': 'Bearer YOUR_API_KEY'
  }
};
request(options, function (error, response) {
  if (error) throw new Error(error);
  console.log(response.body);
});
With these examples, you can efficiently access the 'New Guest Users Since Date' report both within the Chime UI and via the API using your API key.
Related Items
Explore these additional resources to enhance your understanding of Chime's reporting capabilities and make the most out of the Chime V4 Reporting API.
Improve Service Desk Incident Management with SolarWinds Ticketing
View Status & Update Tickets During Chat Sessions
Add a new chat channel to your service desk is an easy way to solve common employee problems, deliver useful FAQs, allow employees to check on the status of existing tickets, and optionally route to service desk agents - located anywhere in the world. New AI functionality also provides ChatGPT level chat services, language translation, chat summarization, and other chat based benefits to help employees solve problems and complete tasks. Use chat to resolve issues - not just create more tickets :)
If you're a service desk user looking to streamline your incident management process and improve collaboration with your support team, you'll want to explore the powerful SolarWinds integration features. These features enable you to access SolarWinds tickets, list incidents, and even create or update tickets, all within your chat environment. In this guide, we'll walk you through the essential steps to make the most of these capabilities.
SolarWinds Ticket Listing
Overview
The SolarWinds Ticket Listing Pipeline Action is designed to fetch open incidents for a seeker and enable them to associate existing SolarWinds incidents with their chat sessions. This integration streamlines communication and issue tracking.
Chime V5 SolarWinds Features
Ensure that you have enabled the following features:
ChimeV5.Ticketing.SolarWinds
ChimeV5.Pipeline.SolarWindsTickets
SolarWinds Instance Configuration
To get started, your tenant admin needs to specify the SolarWinds instance URL and token under Chime Configuration -> SolarWinds.

Enhance AI powered service desk by viewing, creating, and updating SolarWinds tickets
Integrate Solarwinds into your service desk to simplify and improve ticket management
Pipeline Configuration
Key: ID/Name of the pipeline item
Next Stage: Pipeline key to which seeker should be moved after they select and associate an incident with the session.
Drop Stage: Pipeline key to which seeker should be moved if they end their chat. Leave this field as blank to end the chat.
Prompt: This field contains title which will appear on ticket listing card.
Footer Text: This is an optional field that displays the input text at the bottom of the ticket list.
Show Associate Ticket Option: Toggle that shows a button when the ticket is selected to associate the ticket with the chat session.
Associate Ticket Button Text: This field contains the associate button label text.
No Result State: Pipeline key to which seeker should be moved if no incidents are found for seeker.
Lookup tickets using Session Meta Data Field: This field is used for searching incidents in Solarwinds. For most cases it should be seeker email address ${Guest.Email}
Ticket Count: This field is used to define the maximum number of tickets displayed in the list.
Open Tickets: Toggle that populates the list with all open, in progress, or assigned tickets.
Resolved Tickets: Toggle that populates the list with all resolved or closed tickets.
Use Mock Data: Toggle that renders a set of mock data in the ticket list.
Idle Timeout Enabled?: This field is used to define the number of seconds before timeout when on the ticket list pipeline stage.
Options: Additional pipeline navigation options can be added to the ticketing card as required (optional).

Configure your service desk chat flow with the SolarWinds ticket list
Assign the placement in your service desk chat flow and customize your ticket list

Configure how your SolarWinds ticket list displays in your service desk chat
Assign what kind of tickets are displayed, how many, and in what order they display within your service desk chat
Seeker Experience
The pipeline displays a list of open incidents, and clicking on an incident option reveals a link, description, and the last updated timestamp.

View SolarWinds tickets in your AI powered Teams chat
View tickets and associate them with your service desk chat session all from within Teams
Associating Incidents with Chat Sessions
By selecting the option This describes my concern, the seeker associates the incident with the session and moves to the next stage, as configured in the pipeline.

Associate SolarWinds tickets with your service desk chat sessions
Associate tickets and attach metadata to your chat session for easy searching and reporting
Solarwinds Create or Update Ticket
Overview
The Solarwinds Create or Update Ticket Pipeline Action allows you to create a new Solarwinds ticket or update an existing one. It assigns the ticket to an advisor and pushes the chat transcript to the ticket record.
Chime V5 Solarwinds Features
Ensure that you have enabled the following features:
ChimeV5.Ticketing.Solarwinds
ChimeV5.Pipeline.SolarwindsCreateTicket
Pipeline Configuration
Configure this pipeline action with the following elements:
Notify seeker Solarwinds ticket is about to get created/updated: Customize the message to notify the seeker when a ticket is about to be created or updated.
Provide seeker Solarwinds ticket details: This field contains the message to send the seeker, including ticket number, ID, and URL.
Action: Select the action that the pipeline item will commit (Create Ticket or Update Ticket)
Maximum length for ticket title: Select the maximum number of characters allowed in ticket title. If the input text exceeds the selected value it will trim the text

Create or Update SolarWinds tickets within your service desk chat
Simplify the process of creating or updating tickets when chatting with your help desk
Seeker Experience
The pipeline notifies the seeker when an incident is about to be created or updated and provides the seeker with ticket details, including the ticket number and URL for accessing the record. When a ticket is created using Chime V5 the tag VTB2 will be assigned by default. The transcript of the chat session is added to the ‘Comments’ field and any screenshots are displayed inline.
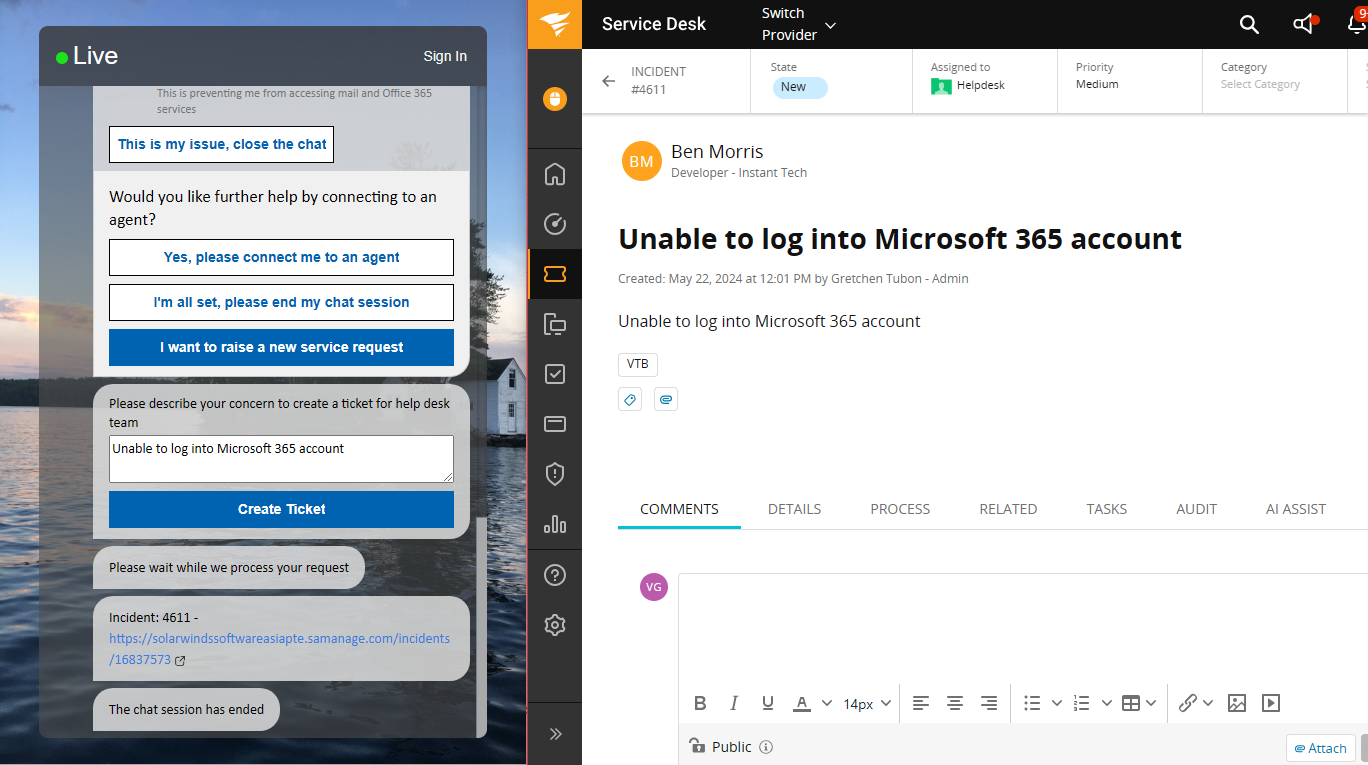
Ask questions and report issues in AI powered chat then easily create or update SolarWinds tickets
Streamline the process of reporting an issue and a help desk chat and creating or updating a ticket
Evaluate JavaScript for accessing Solarwinds Tickets
Overview
In the pipeline action - Evaluate JavaScript, you can utilize various methods to access Solarwinds ticketing API calls. This integration provides a convenient way to interact with Solarwinds tickets directly from your Chime V5 chat sessions.
Chime V5 Solarwinds Features
Before getting started, make sure to enable the following features in Chime V5:
ChimeV5.Ticketing.Solarwinds
Script Method -getSolarwindsTickets('seekerEmailAddress')
To retrieve a list of Solarwinds tickets, use the getSolarwindsTickets script call, passing the seeker's email address as a parameter.
// Get tickets
var tickets = getSolarwindsTickets("${Guest.Email}");
The response will be in the form of a JSON array, providing details about each ticket.
[
  {
    "Seeker": "0007002",
    "Agent": "0007003",
    "Question": "Employee payroll application server is down.",
    "ChatTranscript": "",
    "Id": "f12ca184735123002728660c4cf6a7ef",
    "Number": "0007001",
    "URL": "https://solarwindssoftwareasiapte.samanage.com/0007001",
    "UpdatedOn": "2023-06-07 12:24:46",
    "TicketState": "New"
  },
  {
    "Seeker": "0007002",
    "Agent": "0007003",
    "Question": "Performance problems with wifi",
    "ChatTranscript": "",
    "Id": "78271e1347c12200e0ef563dbb9a7109",
    "Number": "0000057",
    "URL": "https://solarwindssoftwareasiapte.samanage.com/0000057",
    "UpdatedOn": "2023-05-29 13:20:52",
    "TicketState": "New"
  }
]
You can easily convert this JSON response into an array and perform various operations on ticket records.
var ticketsArray = JSON.parse(tickets);

// Array allows you to get count and loop through ticket records, etc.
sendReply("Count of tickets: " + ticketsArray.length);
Script Methods for Ticket Manipulation
Additionally, you can use JavaScript Solarwinds helper calls to create and update tickets:
createSolarwindsTicket(seekerEmailAddress, agentEmailAddress, title, description)updateSolarwindsTicketDescription(ticketId, updatedDescription)assignSolarwindsTicket(ticketId, agentEmailAddress)
These methods enable you to interact with Solarwinds tickets programmatically.
Conclusion
Effective incident management is a cornerstone of successful customer support and business operations. The Solarwinds integration features empower organizations to manage incidents with efficiency and precision. By leveraging JavaScript methods, ticket listing capabilities, and streamlined ticket creation and updates, the feature ensures that your support team is well-equipped to deliver exceptional service.
Incorporating the Solarwinds integration into your chat workflow enables you to access, manage, and respond to incidents seamlessly. Whether you're seeking to access ticket information, associate incidents with chat sessions, or efficiently create and update tickets, Chime V5 offers a comprehensive solution.
Related Items
With these powerful Solarwinds integration features in Chime V5, you can streamline ticket management, enhance communication, and provide a more efficient support experience for your users. Explore these actions to unlock the full potential of Solarwinds within your service desk platform.
09-11-2023 ChatBot Load Testing Report

Even chatbots should be load tested - example of what we do
Here are some load testing results from our chatbot testing last September. We generate these using C# and Azure DirectLine
Summary
The goal of this load testing is to demonstrate Chime V5's scalability to handle significant load between support agents and end-users in a large enterprise.
Typically, our Chime customers route, or receive, approximately 1% of the total employee population\user base, as inbound conversations for day. In this example, our load test demonstrates Chime V5 routing approximately 1,000 inbound service desk chats in a brief 4 hour period.
Outcome: Handled 1,101 chats in 4 hours and 40 minutes.
Overview
Total Chat Sessions: 1,101
Load Test Duration: 4 hours and 40 minutes
First Chat Started: 9/11/2023 08:58:00
Last Chat Started: 9/11/202313:38:00
Wait Times
Maximum Wait Time: 1 minute and 53 seconds
Minimum Wait Time: 3 seconds
Average Wait Time: 8 seconds
Automated Agent Performance
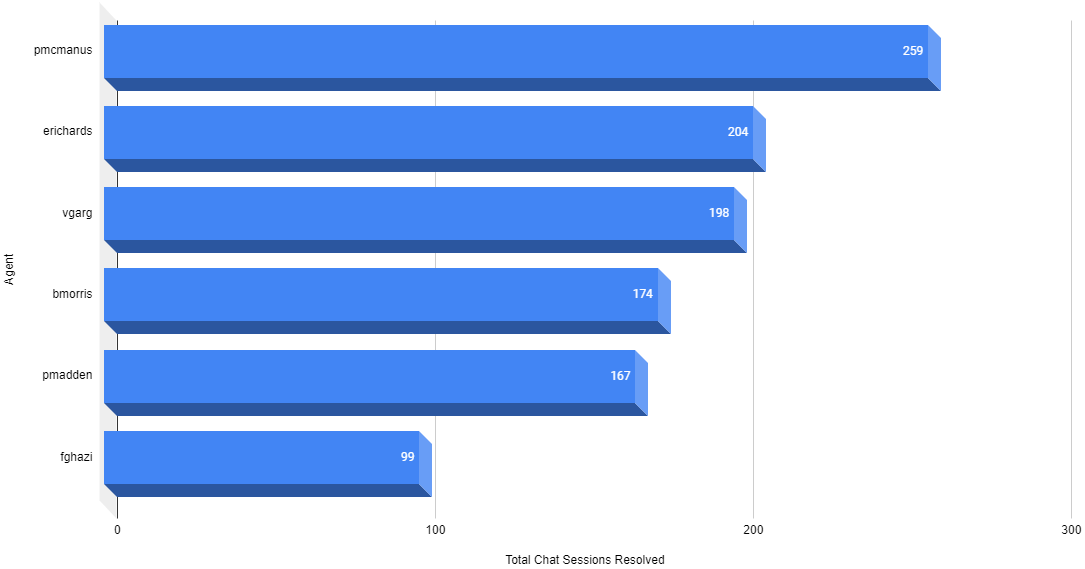
Chatbots need to perform - so they need load testing - we use C#
Our C# load testing application simulates real user load (chat sessions) and forces the engine to handle many concurrent chats over a long period of time
Improve Service Desk Support With JIRA Ticketing Integration
View Status & Update Tickets In Chat Sessions
Chime V5 is a real time chat based service desk focused on quickly resolving employee questions and issues. While chat is a primarily channel for inbound issues, these chat sessions also need to be integrate with common ticketing application - like JIRA.
In today's fast-paced business landscape, efficient customer support is essential for maintaining customer satisfaction and loyalty. Managing incidents and support requests effectively is crucial. That's where Chime's JIRA integration comes to the rescue. In this comprehensive guide, we'll explore how Chime's JIRA Ticket Listing and Create or Update Ticket Pipeline Actions, along with JavaScript API calls, can empower your support team to provide top-notch service.
JIRA Ticket Listing Pipeline Action
Overview
Chime's JIRA Ticket Listing Pipeline Action is a robust tool designed to fetch open incidents for a seeker and enable them to associate an existing JIRA incident with the ongoing chat session. This integration enhances the workflow for both support advisors and seekers.
Chime V5 JIRA Features
Before diving into the details, it's essential to enable the necessary JIRA features in Chime:
ChimeV5.Ticketing.JIRA
ChimeV5.Pipeline.JIRATickets

Jira Integration
Utilize Jira ticketing in chatbot pipeline to create, update, or resolve tickets for end users

Jira Features
Jira features can be enabled in the Admin area
Jira Instance Configuration
Getting started with the JIRA integration is straightforward. Tenant administrators need to specify the JIRA instance URL and credentials within Chime's configuration settings. This ensures a secure and seamless connection between Chime and your JIRA environment.
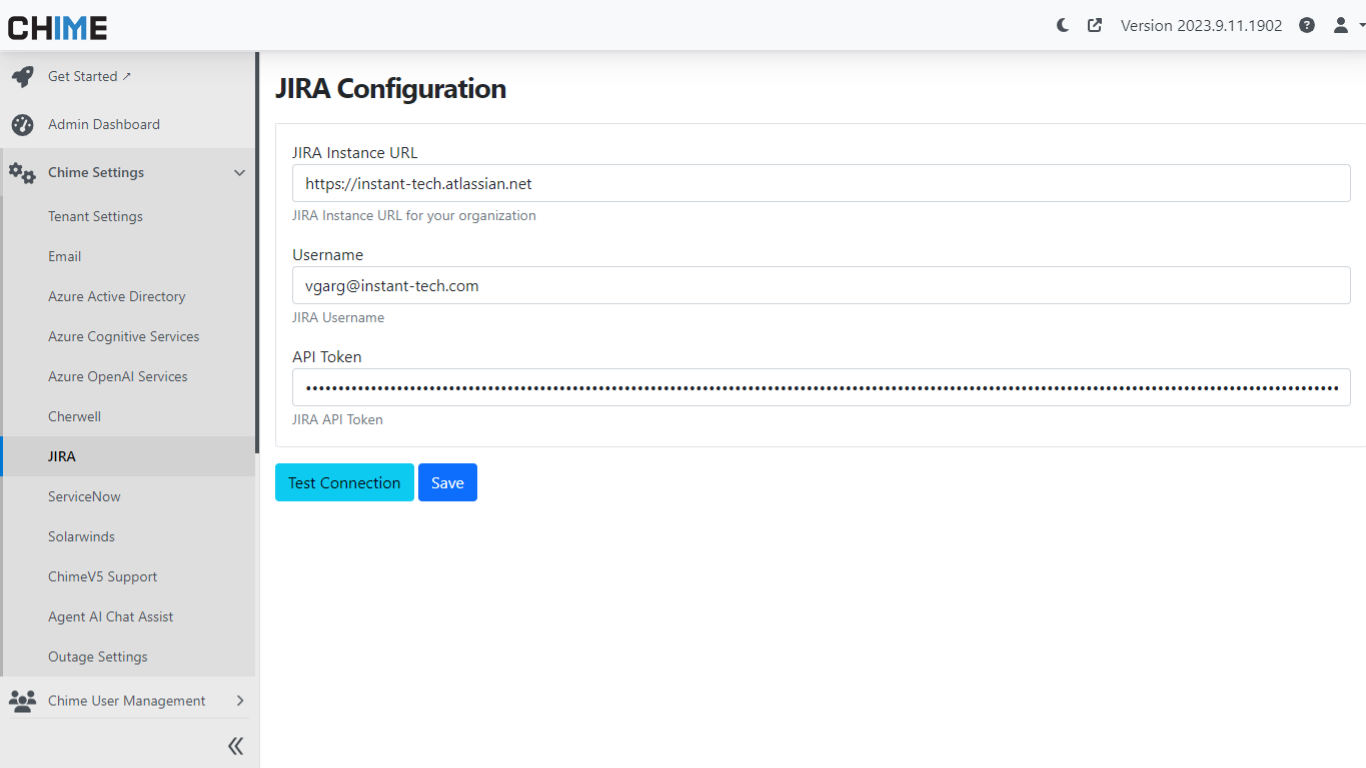
Jira Admin configuration
When you initially set up Jira integration with chatbot you will need to configure API access
Pipeline Configuration
The heart of this integration lies in the pipeline configuration, where you can fine-tune how incidents are handled within Chime:
Next Stage: Pipeline key to which guest should be moved after they select and associate an incident with the session.
Drop Stage: Pipeline key to which chat is moved if guest leaves chat. Leave blank to end chat
Prompt: This field contains title which will appear on ticket listing card.
Footer Text: Text that displays at the bottom/foot of the ticket list. This field is optional
Show Associate Ticket option: Toggle to show button option to associate ticket with session
Associate Ticket Button Text: Label text for the associate ticket button
No Result State: Pipeline key to which guest should be moved if no incidents are found for guest.
Lookup tickets using Session Meta Data Field: This field is used for searching incidents in JIRA. For most cases it should be guest email address ${Guest.Email}
Use Mock Data: Toggle to enable rendering of mock ticket data
Ticket Count: Maximum number of tickets to be displayed in the list
Idle Timeout Enabled?: Toggle to enable timeout for the pipeline item if there is no input from the guest
Timeout Interval: Number of seconds without guest input before timeout
Timeout State: Pipeline key to which guest should be moved if the timeout interval value has been reached
Timeout Message: Message to send to guest when timeout occurs
Options: Additional pipeline navigation options can be added to the ticketing card as required (optional).

Jira Pipeline Ticket Listing
You can customize when tickets are created and updated through our Chat Pipeline feature
Seeker Experience
For seekers, the experience is intuitive. The pipeline displays a list of open incidents, making it simple for them to select the relevant incident. Clicking on an incident option reveals essential details, including links, descriptions, and the last updated timestamp.

Chatbot Jira Ticketing Interface
When the end user wants to update or review an existing ticket, the chat pipeline will present them with details
Associating Incident with Chat Session
Associating an incident with the chat session is seamless. By selecting the option "This describes my concern," seekers can link the incident to the session, and the system moves them to the next stage, as specified in the pipeline configuration.

Metadata associated with the ticket
The chat conversation will collect metadata to further allow review and reporting for Agents and Managers
JavaScript API Calls for JIRA Integration
Within the pipeline action "Evaluate JavaScript," several methods are available to access JIRA ticketing API calls, enabling efficient management and communication with JIRA.
Script Method - getJIRATickets('seekerEmailAddress')
To retrieve a list of tickets, you can use the following script call:
// Get tickets
var tickets = getJIRATickets("${Guest.Email}");
The response will contain a JSON list of tickets, which you can process and analyze as needed.
Script Methods for Creating and Updating Tickets
JavaScript JIRA helper calls provide the ability to update ticket titles and descriptions, as well as assign tickets to specific agents. Here's how you can use these methods:
Update Ticket Title:
// API call to update title
var result = updateJIRATicketTitle('INC0007001', 'Updated title for the incident');
Update Ticket Description:
// API call to update description
var result = updateJIRATicketDescription('INC0007001', 'Please engage network team');
Assign Ticket to an Agent:
// API call to assign ticket
var result = assignJIRATicket('INC0007001', 'agent@domain');
These API calls return a boolean status (True for success, False for failure), ensuring that your incident management process remains efficient and reliable.
JIRA Create or Update Ticket Pipeline Action
Overview
The JIRA Create or Update Ticket Pipeline Action allows you to create new JIRA tickets or update existing ones. It also assignes tickets to specific advisors and pushes chat transcript to ticket records.
Chime V5 JIRA Features
To use Jira integration enable the following JIRA features:
ChimeV5.Ticketing.JIRA
ChimeV5.Pipeline.JIRACreateTicket
Pipeline Configuration
Configure this pipeline action with the following elements:
Notify seeker JIRA ticket is about to get created/updated: This field contains a message to notify the seeker when a ticket is about to be created or updated.
Provide seeker JIRA ticket details: This field contains a message to send the seeker ticket details, including the ticket number, ID, and URL.
Project: Provide the JIRA project name under which tickets should be created/listed.

Jira Create or Update Ticket
If you want the end user to be able to create tickets or update an existing one, you can use this pipeline item to configure where and how they do that
Seeker Experience
For seekers, this pipeline action ensures a smooth experience. They are notified when an incident is about to be created or updated. They also receive ticket details, including the ticket number and URL, to access the ticket record.

Jira Ticket creation
What it looks like to go through and create a new ticket for an end user
Conclusion
By leveraging Chime's JIRA integration and JavaScript API calls, your support team can streamline incident management, providing prompt and effective support to your customers. Whether you need to retrieve ticket data, create new incidents, or update existing ones, Chime's integration offers a robust solution.
For further information on JIRA ticket listing and creating or updating tickets, refer to the related items listed above. Explore the possibilities and elevate your customer support capabilities with Chime's JIRA integration today!
Related Items
To further enhance your understanding and utilization of the JIRA integration in Chime, here are some related resources:
2. Use JavaScript for accessing JIRA tickets
These resources provide valuable insights into utilizing JavaScript API calls to access and manage JIRA ticketing data, Microsoft Teams integration, as well as other ticketing services allowing you to unlock even more capabilities for your customer support.
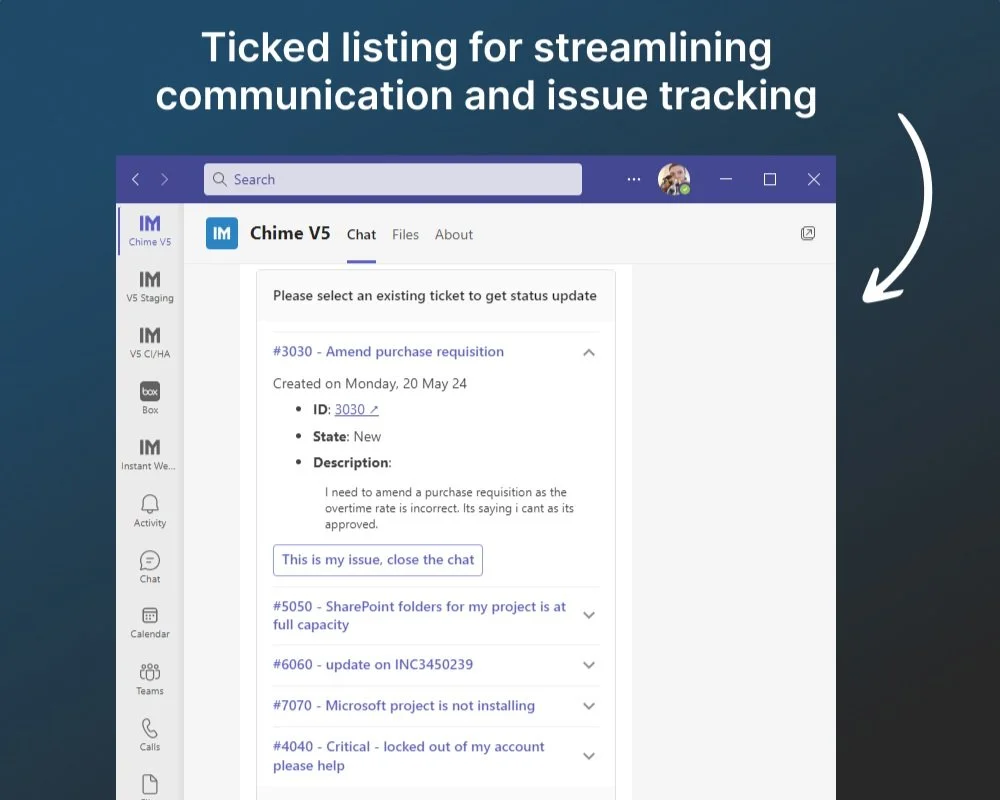
Add ServiceNow Ticketing Integration to Service Desk Chat
Track Ticket Activity & Update Ticket Status During Chat Sessions
Help your employees solve common problems by deploying an enterprise chat service. Reply with common FAQs, integrate directly into Microsoft Teams, and connect with ServiceNow to track all activity, display, create, and resolve tickets directly from chat - and solve questions immediately.
In today's fast-paced business environment, efficient customer support is essential. Streamlining the process of accessing and managing incidents is crucial for businesses looking to provide exceptional service to their customers. This is where the ServiceNow integration in Chime comes into play. In this blog post, we will explore how Chime's ServiceNow Ticket Listing Pipeline Action and JavaScript API calls can help you enhance your customer support capabilities.
ServiceNow Ticket Listing Pipeline Action
Overview
Chime's ServiceNow Ticket Listing Pipeline Action is a powerful tool that allows you to fetch open incidents for a seeker and associate an existing ServiceNow incident with the chat session. This integration simplifies the workflow for your support team, enabling them to quickly identify and address seeker requests.
Chime V5 ServiceNow Features
Before diving into the details, it's essential to enable the necessary ServiceNow features in Chime:
ChimeV5.Ticketing.ServiceNow
ChimeV5.Pipeline.ServiceNowTickets
Service-Now Instance Configuration
To get started with this integration, your tenant admin will need to specify the ServiceNow instance URL and credentials in Chime's configuration settings. This step ensures a secure connection between Chime and your ServiceNow environment.

View the different enterprise service desk actions for Service-Now ticketing
Add a chatbot, or chat FAQ system, and integrate with ServiceNow - solve problems before creating a ticket

Configure your Service-Now credentials and Instance URL for your tenant
Add a chat FAQ or Chat Q&A to your ServiceNow ticketing system. Solve employee problems with chat - instead of just tickets
Pipeline Configuration
The pipeline configuration is a crucial part of this integration, as it determines how incidents are managed within Chime.
Prompt: This field contains the title that will appear on the ticket listing card, providing clarity to your support team.
No Result State: Specifies the pipeline key to which the seeker should be moved if no incidents are found for the seeker, ensuring a smooth experience.
Lookup tickets using Session Meta Data Field: This field is used for searching incidents in ServiceNow, typically using the seeker's email address, making it easy to locate relevant incidents.
Next Stage: Specifies the pipeline key to which the seeker should be moved after they select and associate an incident with the session.
Options: Additional pipeline navigation options can be added to the ticketing card as needed, enhancing the user experience.

Define Service-Now ticket list fields for results for service desk chat flow placement and results
Add ServiceNow services to any area of the chat service. Display list of tickets using chat, create tickets, and solve issues with FAQs
Seeker Experience
For seekers, the experience is seamless. The pipeline shows a list of open incidents, making it easy for them to select the relevant incident. Clicking on an incident option reveals essential details, including links, descriptions, and the last updated timestamp.

View Service-Now tickets in your AI powered web chat
Associating Incident with Chat Session
Associating an incident with the chat session is a breeze. Using the option "This describes my concern," seekers can link the incident to the session, and the system will move them to the next state as specified in the pipeline configuration.
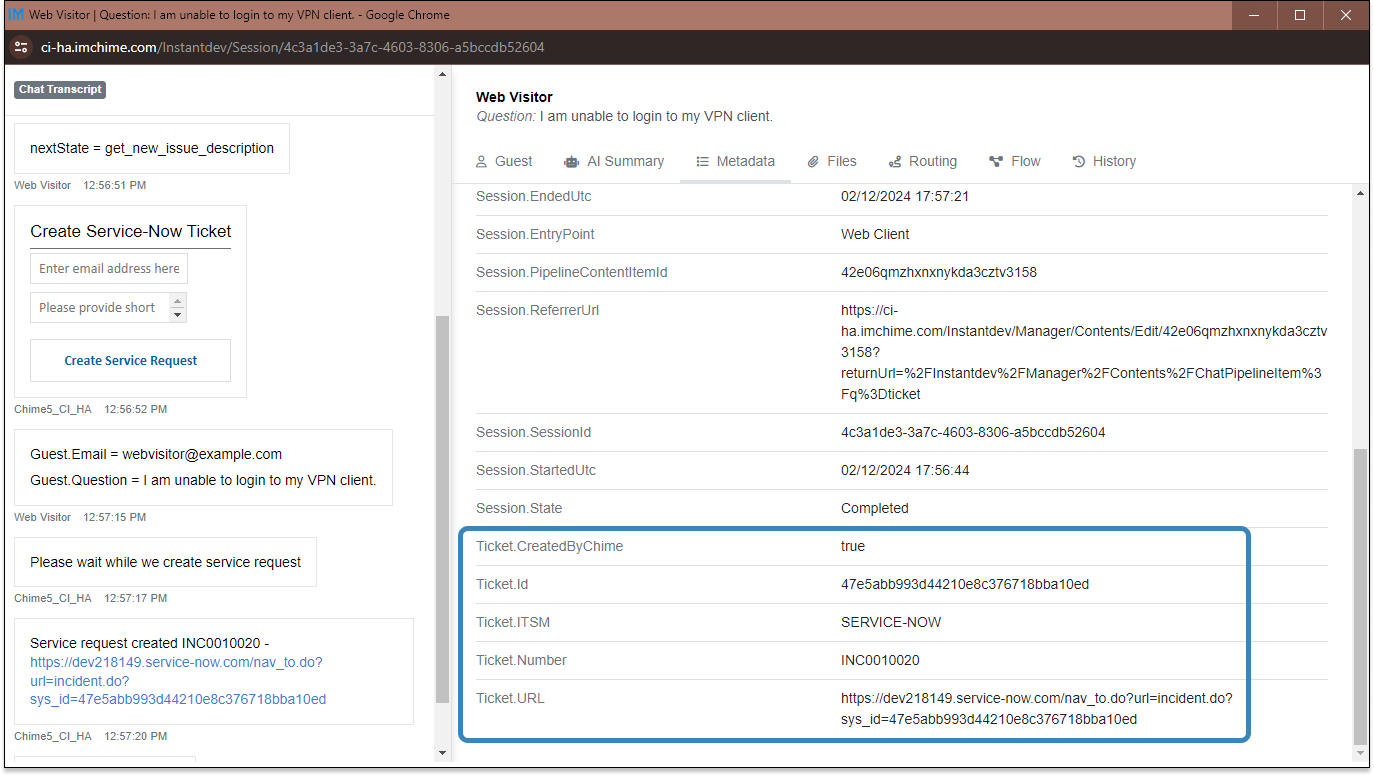
Associate Service-Now tickets with service desk chat sessions
Add chat, and chat FAQS, to an existing ServiceNow ticketing system. Service desk agents can use these chats to help employees
JavaScript API Calls for ServiceNow Integration
Chime V5 ServiceNow Features
Before diving into the details, it's essential to enable the necessary ServiceNow features in Chime:
ChimeV5.Pipeline.ScriptChoice
In the pipeline action, "Evaluate JavaScript," several methods are available to access ServiceNow ticketing API calls, enabling you to perform various tasks efficiently.
Script Method - getServiceNowTickets('seekerEmailAddress')
To retrieve a list of tickets, you can use the following script call:
Assign Ticket to an Agent:
These API calls return updated ticket records, ensuring that your incident management process remains efficient.
ServiceNow Create or Update Ticket Pipeline Action
Overview
The JIRA Create or Update Ticket Pipeline Action allows you to create new JIRA tickets or update existing ones. It also assigns tickets to specific advisors and pushes chat transcript to ticket records.
Chime V5 ServiceNow Features
To use Jira integration enable the following ServiceNow features:
ChimeV5.Pipeline.ServiceNowCreateTicket
Pipeline Configuration
Notify seeker incident is about to get created: Message to notify the seeker that a ticket is about to be created
Provide seeker incident details: Message to provide seeker with ticket details: ${Ticket.Number}, ${Ticket.URL}
Associate Question with specified ServiceNow Field: short_description
Associate seeker email address with specified ServiceNow Field: caller_id
Associate agent email address with specified ServiceNow Field: assigned_to
Associate chat transcript with specified ServiceNow Field: work_notes
Associate incident number with Session Meta data property: Ticket.Number
Associate incident sysId with Session Meta data property: Ticket.Id
Associate incident URL with Session Meta data property: Ticket.URL

Define Service-Now fields for easy ticket creation mid-chat
Display a list of open tickets for an employee using chat - so employees can check on status without engaging an agent

Define Service-Now fields for easy ticket creation mid-chat
Solve employee questions with chat and Microsoft Teams - and track everything using ServiceNow
Seeker Experience
For seekers, this pipeline action ensures a smooth experience. They are notified when an incident is about to be created or updated. They also receive ticket details, including the ticket number and URL, to access the ticket record.

Create a new ServiceNow ticket within your help desk chat flow
Conclusion
With Chime's ServiceNow integration, you can streamline your incident management process, making it easier for your support team to address seeker requests promptly. By leveraging JavaScript API calls, you can take your customer support to the next level, providing exceptional service to your clients.
For further information on ServiceNow ticket listing and ticketing metrics, refer to the related items listed above. Explore the possibilities and enhance your customer support capabilities with Chime's ServiceNow integration today!
Related Items
To further enhance your understanding and utilization of the ticketing integration in Chime, here are some related resources:
1. Use JavaScript for accessing ServiceNow Tickets
These resources provide valuable insights into utilizing JavaScript API calls to access ServiceNow ticketing data, Microsoft Teams integration, as well as other ticketing services allowing you to unlock even more capabilities for your customer support.
Integrate Cherwell Ticketing To Your Chat Service Desk
Streamline Issue Resolution and Solve Problems With Cherwell Ticketing
Use chat to quickly resolve common issues, and problems, that your employees encounter. Employees may be working remotely, and working with new applications, printers, laptops, or other systems where they encounter problems. Adding chat to your service desk provides a very easy channel for employees to resolve issues, search FAQs, and optionally route to service desk agents. Use chat to solve problems - not just create more tickets.
In the fast-paced world of customer support, efficiency is key. Modern organizations rely on ticketing systems to manage customer inquiries and incidents effectively. Chime, a versatile communication and collaboration platform, has seamlessly integrated with Cherwell, a leading IT service management (ITSM) platform. This integration empowers support teams to streamline ticket management and enhance the customer support experience. In this comprehensive blog post, we will explore the various facets of Cherwell Ticketing Integration in Chime.
Cherwell Ticket Listing Pipeline Action
Overview
The Cherwell Ticket Listing Pipeline Action is a critical feature within Chime that enables support teams to fetch open incidents from Cherwell and associate them with chat sessions. This integration simplifies the process of identifying and addressing seeker requests for advisors.
Chime V5 Cherwell Features
To use Cherwell integration, enable the following Cherwell features within Chime:
ChimeV5.Ticketing.Cherwell
ChimeV5.Pipeline.CherwellTickets
Cherwell Instance Configuration
Before diving into the integration, administrators need to configure the Cherwell instance in Chime. This involves specifying the Cherwell instance URL and providing the necessary credentials in the Chime Configuration settings.
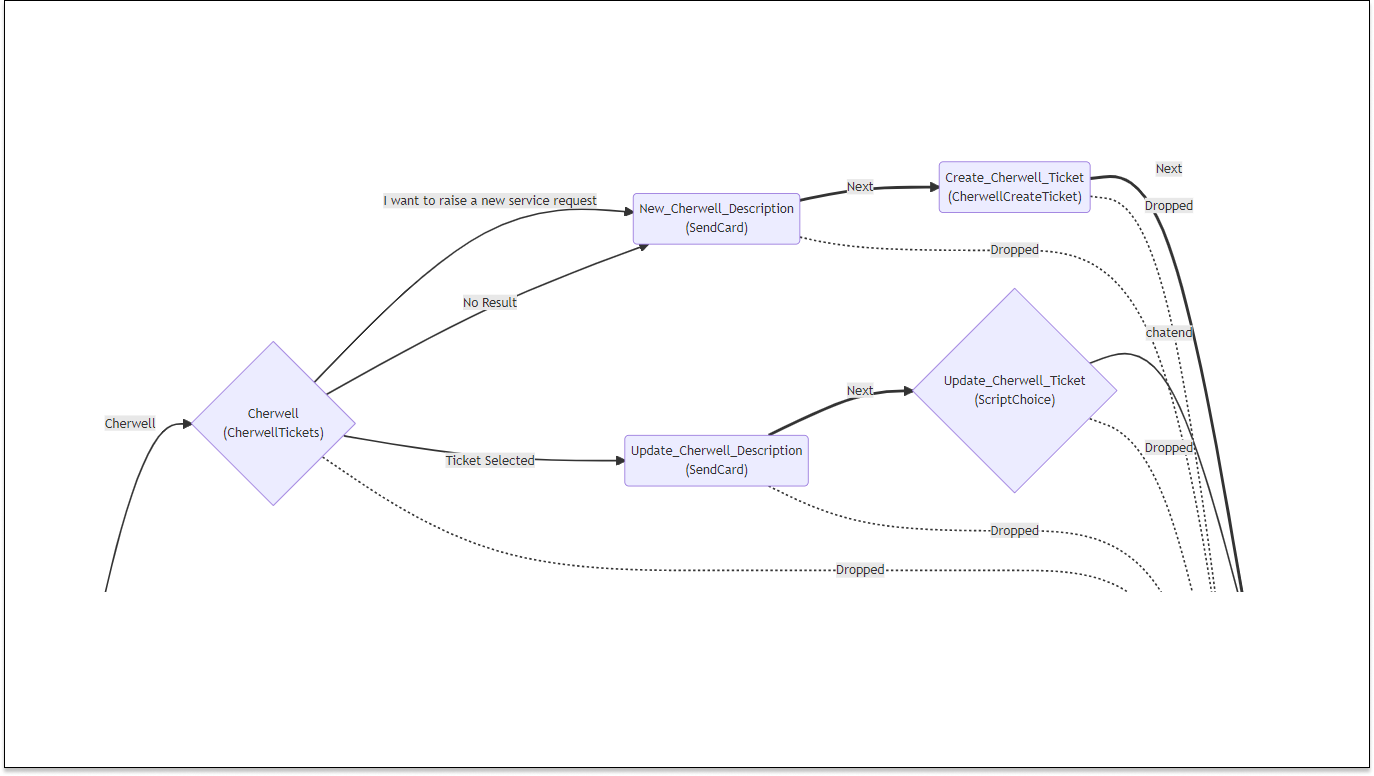
Configure chat to work with Cherwell ticketing and add a chat channel to Cherwell
Use chat to solve employee issues - and also create Cherwell tickets to track all interactions

Add chat to Cherwell ticketing
Simply configure the Cherwell settings to connect chat to your Cherwell instance
Pipeline Configuration
The heart of this integration lies in the Pipeline Configuration, where you define how the ticketing system should function within Chime. Key elements to configure include:
Prompt: This field contains the title that will appear on the ticket listing card, providing context to advisors.
No Result State: Specify the pipeline key to which the seeker should be moved if no incidents are found for the seeker.
Lookup tickets using Session Meta Data Field: This field is used for searching incidents in Cherwell. In most cases, it should be the seeker's email address, simplifying the matching of incidents.
Next Stage: Determine the pipeline key to which the seeker should be moved after they select and associate an incident with the session.
Options: Additional pipeline navigation options can be added to the ticketing card as needed.

Configure your service desk chat flow with the Cherwell ticket list
Assign the placement in your service desk chat flow and customize your ticket list
Seeker Experience
For seekers, the experience is straightforward and user-friendly. When initiating a chat session, the pipeline displays a list of open incidents. Clicking on an incident option reveals essential information such as the incident's link, description, and the last updated timestamp.

View Cherwell tickets in your AI powered web chat
View tickets and associate them with your service desk chat session all from within web chat
Associating Incidents with Chat Sessions
Associating an incident with the chat session is effortless for seekers. They can select the option that best describes their concern, which associates the incident and moves the seeker to the next stage, as specified in the pipeline configuration.

Associate Cherwell tickets with your service desk chat sessions
Associate tickets and attach metadata to your chat session for easy searching and reporting
JavaScript API Calls for Cherwell Integration
For advanced interactions with Cherwell ticketing APIs, Chime offers JavaScript Cherwell helper methods. Here are some key methods and examples:
Script Method - getCherwellTickets('seekerEmailAddress')
This method retrieves a list of tickets associated with a seeker's email address. The script call appears as follows:
The response is a JSON array containing ticket details, which can be easily manipulated within your chat pipeline.
Script Methods for Ticket Updates
Chime's JavaScript Cherwell helper calls enable you to update ticket descriptions and assign tickets to specific advisors. Here are the methods and examples:
updateCherwellTicketDescription(ticketNumber, updatedDescription)
assignCherwellTicket(ticketNumber, agentEmailAddress)
// API call to update description
var result = updateCherwellTicketDescription('00070', 'Please engage the network team');
// API call to assign the ticket
var result = assignCherwellTicket('00070', 'agent@domain');
These API calls return the updated ticket records, enabling seamless ticket management.
Cherwell Create or Update Ticket Pipeline Action
Overview
The Cherwell Create or Update Ticket Pipeline Action allows you to create new Cherwell tickets or update existing ones. It also assigns tickets to specific advisors and pushes chat transcripts to ticket records.
Chime V5 Cherwell Features
To use Cherwell integration, enable the following Cherwell features within Chime:
ChimeV5.Ticketing.Cherwell
ChimeV5.Pipeline.CherwellCreateTicket
Pipeline Configuration
Configure this pipeline action with the following elements:
Notify seeker Cherwell ticket is about to get created/updated: This field contains a message to notify the seeker when a ticket is about to be created or updated.
Provide seeker Cherwell ticket details: This field contains a message to send the seeker ticket details, including the ticket number, ID, and URL.

Create or Update Cherwell tickets within your service desk chat
Simplify the process of creating or updating tickets when chatting with your help desk
Seeker Experience
For seekers, this pipeline action ensures a smooth experience. They are notified when an incident is about to be created or updated. They also receive ticket details, including the ticket number and URL, to access the ticket record.

Ask questions and report issues in AI powered chat then easily create or update Cherwell tickets
Streamline the process of reporting an issue and a help desk chat and creating or updating a ticket
Conclusion
The Cherwell Ticketing Integration in Chime streamlines customer support and incident management. By configuring Cherwell instances, defining pipeline actions, and leveraging JavaScript helper methods, support teams can seamlessly manage tickets, update ticket details, and enhance the overall support experience. This integration empowers organizations to deliver exceptional customer support efficiently.
For additional information and resources on Cherwell integration in Chime, explore the related items and documentation provided. With these powerful tools at your disposal, you can elevate your customer support capabilities and provide superior service to your customers.
Related Items
To further enhance your understanding and utilization of the Cherwell integration in Chime, here are some related resources:
1. Create/Update Cherwell Ticket
2. Use JavaScript for accessing Cherwell tickets
These resources provide valuable insights into utilizing JavaScript API calls to access and manage JIRA ticketing data, Microsoft Teams integration, as well as other ticketing services allowing you to unlock even more capabilities for your customer support.
How to Add FAQ Article Into Tenant Landing Page (a Video Guide)
Enhance User Access with Featured FAQs
Overview of the Tenant Landing Page
The tenant landing page consists of two main components:
Header: Includes header text and a search bar.
Cards Container: In Chime V5, each card is called Featured Content.
Understanding Featured Content Cards
A Featured Content card contains a list of FAQ articles. As a manager, you have the ability to add or remove FAQ articles within these cards.
Purpose of Featured Content: Featured Content brings selected FAQ articles into focus on the landing page. If your platform has thousands of FAQ articles, using Featured Content helps the selection to display only the articles deemed most useful or important.
Steps to Add an FAQ Article to a Featured Content Card
Step 1: Access the Manager Dashboard
Log into your account and go to the Manager Dashboard.
Step 2: Navigate to Content Section
From the dashboard, proceed to the "Content" menu and then to "Featured Content."
Step 3: Choose the Card to Edit
Identify and click on the Featured Content card where you wish to include a new FAQ article.
Step 4: Search and Add the FAQ Article
Utilize the search function to find the FAQ article you want to feature. Once found, add it to the selected Featured Content card.
Step 5: Publish the Changes
After adding the FAQ article, complete the update by clicking the "Publish" button.
Verifying the Update
To confirm that the FAQ article has been added successfully, navigate back to the tenant landing page. Check that the Featured Content card now includes the new FAQ article you have added.
By following these steps, you'll be able to highlight key information on your tenant support landing page, making it easier for users to find what they need.